Are you dreaming of juicy, sun-ripened tomatoes bursting with flavor, but lack the space or the time for a traditional garden? Or perhaps you're tired of constantly worrying about whether your tomato plants are getting enough water? Then, the world of self-watering containers might just be your gardening salvation! Let's dive in and explore how you can grow amazing tomatoes using this clever and convenient method. The Magic of Self Watering Containers for Tomato Plants Self-watering containers, sometimes called sub-irrigated planters (SIPs), are designed to provide a consistent and reliable water supply to your plants, minimizing the need for frequent watering and dramatically reducing water waste. For tomato plants, which are known for their thirstiness, this can be a game-changer! The beauty of a tomato plant self watering container lies in its simplicity and efficiency. It essentially creates a mini-reservoir beneath the soil, allowing the plant...
There's nothing quite like the taste of a sun-ripened, juicy tomato picked straight from your own garden. But what if you could get a head start on the growing season, ensuring an even earlier and more bountiful harvest? That's where growing tomatoes from seed in a propagator comes in! It’s a game-changer for any tomato enthusiast.
Why Start Tomato Seeds in a Propagator?
Starting your tomato seeds indoors in a propagator offers a wealth of advantages, especially for those of us living in regions with shorter growing seasons. A propagator creates a controlled environment, providing the perfect conditions for germination and early seedling development. Here's a breakdown of the key benefits:
- Extended Growing Season: By starting seeds indoors, you can add several weeks to your growing season. This is crucial for tomato plants, which require a relatively long time to mature and produce fruit.
- Improved Germination Rates: Propagators maintain consistent temperature and humidity levels, leading to higher germination rates compared to direct sowing outdoors. Tomato seeds, in particular, thrive in warm, humid conditions.
- Protection from the Elements: Young seedlings are delicate and vulnerable to pests, diseases, and harsh weather conditions. A propagator provides a safe and protected environment, ensuring their survival.
- Control Over Growing Conditions: You have complete control over the temperature, humidity, and light exposure, optimizing conditions for healthy seedling growth.
- Cost-Effective: Growing your own tomato plants from seed is significantly cheaper than buying established seedlings from a nursery.
Choosing the Right Propagator for Growing Tomato Seedlings
Propagators come in various shapes, sizes, and designs. Selecting the right one for your needs is essential for successful tomato seedling development. Here's what to consider:
Types of Propagators
There are generally two main types of propagators:
- Unheated Propagators: These are simple trays with a clear lid to trap humidity and warmth. They rely on ambient temperatures to warm the soil. These are best for areas with consistent warm temperatures.
- Heated Propagators: These propagators include a heating mat or element to maintain a consistent soil temperature. This is particularly beneficial in cooler climates or during early spring when temperatures fluctuate.
While unheated propagators can be sufficient in warmer climates, a heated propagator is generally recommended for growing tomatoes from seed, especially if you're starting them early in the season. The consistent warmth helps to speed up germination and promote strong root development.
Key Features to Look For
When choosing a propagator, consider the following features:
- Size: Select a propagator that is large enough to accommodate the number of tomato seedlings you plan to grow. Remember, tomato seedlings will need space to grow before being transplanted.
- Ventilation: Adequate ventilation is crucial to prevent damping-off, a fungal disease that can quickly kill young seedlings. Look for a propagator with adjustable vents.
- Clear Lid: A clear lid allows light to reach the seedlings while trapping humidity.
- Heating Element (for Heated Propagators): Ensure the heating element is reliable and provides consistent heat. Some models have adjustable temperature controls.
- Durability: Choose a propagator made from sturdy materials that will last for several seasons.
Starting tomatoes from seed is easier than ever with a little help from modern technology. Consider the Ahopegarden Indoor Garden Hydroponics Growing System: 10 Pods Plant Germination Kit Aeroponic Herb Vegetable Growth Lamp Countertop with LED Grow Light. This innovative hydrophonic planter helps you grower your own harvests and nurture lettuce. You can learn more and purchase the aeroponic herb vegetable growth lamp here: https://amzn.to/3RPpa Sk.
The Step-by-Step Guide to Growing Tomatoes from Seed in a Propagator
Now, let's dive into the practical steps of growing tomatoes from seed in a propagator:
1. Gather Your Supplies
You'll need the following supplies:
- Tomato seeds (choose varieties suited to your climate)
- Seed starting mix (a fine-textured, sterile mix specifically designed for seed germination)
- Propagator (heated or unheated)
- Seed trays or small pots
- Watering can or spray bottle
- Labels and a permanent marker
- Heat mat thermostat (if using a heated propagator)
- Grow lights (optional, but recommended for consistent growth)
2. Sow Your Seeds
Here's how to sow your tomato seeds:
- Moisten the seed starting mix: Add water to the mix until it is evenly moist but not soggy.
- Fill the seed trays or pots with the moistened mix.
- Sow the seeds: Sow 2-3 seeds per cell or pot, about ¼ inch deep.
- Cover the seeds: Gently cover the seeds with more seed starting mix.
- Water gently: Water the soil gently using a watering can or spray bottle to avoid disturbing the seeds.
- Label your trays or pots: Label each tray or pot with the tomato variety and the date of sowing.
3. Place in the Propagator
Now, it's time to place your seed trays or pots in the propagator:
- Place the seed trays or pots in the propagator.
- Close the lid: Close the lid of the propagator to trap humidity and warmth.
- Set the temperature (for heated propagators): If using a heated propagator, set the temperature to around 75-80°F (24-27°C).
- Provide light: Place the propagator in a location that receives bright, indirect light. If natural light is insufficient, use grow lights.
4. Maintain Optimal Conditions
Maintaining optimal conditions is crucial for successful germination and seedling development:
- Temperature: Maintain a consistent temperature of 75-80°F (24-27°C) for optimal germination. Once seedlings emerge, you can lower the temperature slightly to around 70°F (21°C).
- Humidity: Maintain high humidity levels inside the propagator. Check the humidity regularly and mist the seedlings with water if the soil surface appears dry.
- Light: Provide 14-16 hours of light per day. Use grow lights if natural light is insufficient.
- Ventilation: Open the vents of the propagator regularly to provide fresh air and prevent damping-off. Start with short periods of ventilation and gradually increase the duration as the seedlings grow.
- Watering: Water the seedlings regularly to keep the soil moist but not soggy. Avoid overwatering, as this can lead to root rot.
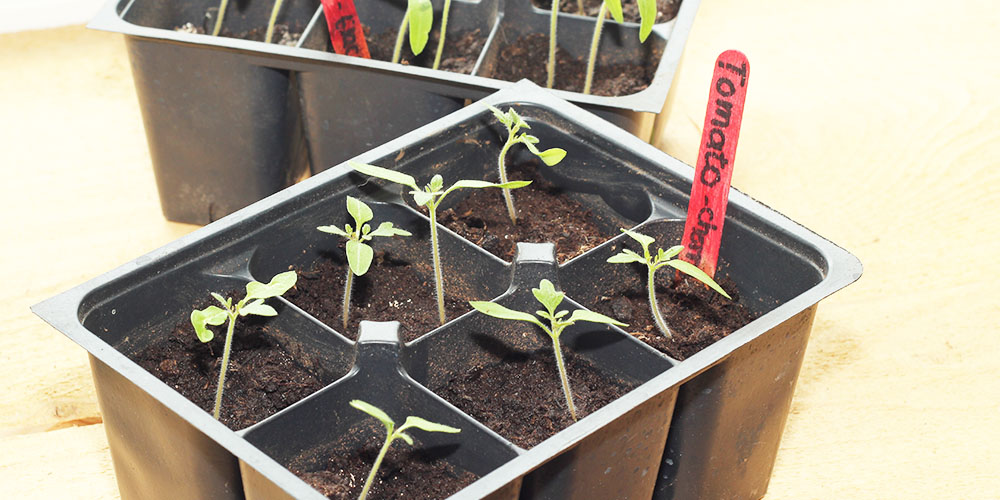
5. Thinning Seedlings
Once the seedlings have developed their first true leaves (the second set of leaves), thin them out to one seedling per cell or pot. Choose the strongest, healthiest seedling and carefully snip off the others at soil level.
6. Hardening Off
Before transplanting your tomato seedlings outdoors, you need to "harden them off." This process gradually acclimates the seedlings to outdoor conditions, reducing the risk of shock. Here's how to harden off your seedlings:
- Start hardening off the seedlings about 1-2 weeks before the last expected frost.
- Place the propagator outdoors in a sheltered location for a few hours each day, gradually increasing the duration over several days.
- Protect the seedlings from direct sunlight and strong winds during the hardening off process.
- After about a week, the seedlings should be able to tolerate full sun and be ready for transplanting.
Troubleshooting Common Problems When Growing Tomatoes From Seed
Even with the best care, you might encounter some common problems when growing tomatoes from seed. Here's how to troubleshoot them:
- Poor Germination: Ensure the seeds are fresh and viable. Check the temperature and humidity levels in the propagator. Overwatering or underwatering can also affect germination.
- Damping-Off: This fungal disease can kill young seedlings quickly. Ensure good ventilation and avoid overwatering. Use a sterile seed starting mix to prevent the disease.
- Leggy Seedlings: Leggy seedlings are tall and spindly due to insufficient light. Provide more light or move the seedlings closer to the light source.
- Yellowing Leaves: Yellowing leaves can be caused by overwatering, nutrient deficiencies, or pest infestations. Adjust your watering schedule and fertilize the seedlings with a balanced liquid fertilizer.
- Pest Infestations: Monitor the seedlings regularly for pests such as aphids, whiteflies, or spider mites. Treat infestations with insecticidal soap or neem oil.
Choosing the Right Tomato Variety For Your Propagator
Consider the size and space limitations of your propagator when selecting tomato varieties. Here's a breakdown of tomato types and their suitability for propagator starts:
- Determinate Tomatoes: These varieties grow to a specific size and produce their fruit all at once. They are generally more compact and well-suited for smaller propagators and container gardening. Examples include Roma, Celebrity, and Rutgers.
- Indeterminate Tomatoes: These varieties continue to grow and produce fruit throughout the growing season. They can become quite large and require staking or caging. While you can start them in a propagator, be prepared to transplant them into larger containers as they grow. Examples include Beefsteak, Brandywine, and Cherry tomatoes.
- Dwarf Tomatoes: These varieties are specifically bred to be compact and well-suited for container gardening and smaller spaces. They are an excellent choice for growing in a propagator and then transplanting into pots or small raised beds.
Conclusion
Growing tomatoes from seed in a propagator is a rewarding experience that allows you to enjoy fresh, homegrown tomatoes earlier in the season. By following these steps and providing the right conditions, you can successfully cultivate healthy tomato seedlings and enjoy a bountiful harvest. So, grab your seeds, fire up your propagator, and get ready to taste the sweet reward of your labor!