Are you dreaming of juicy, sun-ripened tomatoes bursting with flavor, but lack the space or the time for a traditional garden? Or perhaps you're tired of constantly worrying about whether your tomato plants are getting enough water? Then, the world of self-watering containers might just be your gardening salvation! Let's dive in and explore how you can grow amazing tomatoes using this clever and convenient method. The Magic of Self Watering Containers for Tomato Plants Self-watering containers, sometimes called sub-irrigated planters (SIPs), are designed to provide a consistent and reliable water supply to your plants, minimizing the need for frequent watering and dramatically reducing water waste. For tomato plants, which are known for their thirstiness, this can be a game-changer! The beauty of a tomato plant self watering container lies in its simplicity and efficiency. It essentially creates a mini-reservoir beneath the soil, allowing the plant...
There’s nothing quite like the taste of a homegrown tomato, bursting with flavor and sunshine. But did you know that the journey from tiny seed to juicy fruit starts long before you see those vibrant red globes appear in your garden? Growing tomatoes from seed to transplant is a rewarding experience that puts you in complete control of your tomato crop, giving you a head start on the growing season and access to a wider variety of tomato types than you might find at your local nursery.
The Joy of Growing Tomatoes From Seed
Growing your own tomatoes from seed is more than just a gardening task; it's an act of connection to nature and a source of immense satisfaction. You get to witness the miracle of life unfold, from the first tiny sprout emerging from the soil to the eventual harvest of delicious, sun-ripened tomatoes. It's also a cost-effective way to grow a large quantity of tomato plants, especially if you're interested in exploring heirloom varieties or unique cultivars that aren't readily available commercially. Plus, starting from seed allows you to control the entire process, ensuring your plants are healthy and strong from the very beginning.
Choosing the Right Tomato Varieties for Seed Starting
The first step in your tomato-growing adventure is selecting the right varieties for your specific needs and climate. Consider factors like your growing season length, desired tomato size and flavor, and disease resistance. Some varieties are better suited for container gardening, while others thrive in the open ground. It's a good idea to research different tomato types and choose those that are known to perform well in your area.
Here's a breakdown of some popular tomato types and their characteristics:
Determinate Tomatoes: These varieties grow to a specific size and then stop, producing all their fruit at once. They are ideal for canning and small spaces. Examples include Roma and Celebrity.
Indeterminate Tomatoes: These tomatoes continue to grow and produce fruit throughout the entire growing season. They require staking or caging and are known for their extended harvest period. Examples include Beefsteak, Brandywine, and Cherry tomatoes.
Heirloom Tomatoes: These are open-pollinated varieties that have been passed down through generations. They are known for their unique flavors, colors, and shapes, but they may be more susceptible to diseases than hybrid varieties.
Hybrid Tomatoes: These are created by cross-pollinating two different tomato varieties. They are often bred for disease resistance, yield, and uniformity.
Don't be afraid to experiment with different varieties to find your favorites. Consider starting a few plants of each type to see how they perform in your garden.
Gathering Your Tomato Seed Starting Supplies
Before you sow your first tomato seed, make sure you have all the necessary supplies on hand. This will ensure a smooth and successful seed starting experience. Here’s a list of essential items:
Tomato Seeds: Purchase high-quality seeds from a reputable supplier. Consider heirloom or organic options for the best flavor and environmental benefits. Seed Starting Trays or Pots: These should have drainage holes to prevent waterlogging. You can use plastic trays, peat pots, or even repurposed containers. Seed Starting Mix: This is a sterile, lightweight potting mix specifically designed for seed germination. Avoid using garden soil, as it may contain pathogens and weed seeds. Watering Can or Spray Bottle: For gently watering your seedlings without disturbing them. Heat Mat (Optional): Provides bottom heat to speed up germination, especially beneficial in cooler climates. Grow Lights (Optional): Supplement natural light, especially important if you don't have a sunny windowsill. A quality set of grow lights can really boost seedling growth. If you're looking to enhance your seed starting efforts and ensure a steady supply of greens even without relying on a sunny window, consider the benefits of an indoor hydroponic system. One excellent option is the Ahopegarden Indoor Garden Hydroponics Growing System, which features 10 pods for plant germination and an LED grow light, perfect for growing herbs and vegetables indoors. Find it here: https://amzn.to/3RPpa Sk. Labels and Marker: To keep track of which varieties you've planted in each container. Spray bottle: For spraying seedlings to moisten the top soil and prevent damping off.
Having all your supplies organized and ready to go will make the seed starting process much easier and more enjoyable.
The Step-by-Step Guide to Starting Tomato Seeds
Now that you have your supplies and chosen your tomato varieties, it's time to get your hands dirty and start sowing those seeds! Here's a step-by-step guide to starting tomato seeds:
1.Prepare Your Seed Starting Trays or Pots: Fill your chosen containers with seed starting mix, leaving about half an inch of space at the top. Gently press down the soil to create a firm surface.
2.Sow the Seeds: Make a small indentation in the soil (about ¼ inch deep) and place one or two tomato seeds in each indentation. Cover the seeds with a thin layer of seed starting mix.
3.Water Gently: Use a watering can or spray bottle to moisten the soil. Be careful not to overwater, as this can lead to damping off, a fungal disease that can kill young seedlings.
4.Provide Warmth: Place the seed starting trays or pots on a heat mat (if using) or in a warm location. The ideal soil temperature for tomato seed germination is between 75-85°F (24-29°C).
5.Maintain Moisture: Keep the soil consistently moist but not soggy. You can cover the trays or pots with a plastic dome or plastic wrap to help retain moisture.
6.Provide Light: Once the seedlings emerge, remove the plastic dome or wrap and place them under grow lights or in a sunny windowsill. Tomato seedlings need at least 6-8 hours of light per day.
7.Thin Seedlings (If Necessary): If you planted more than one seed per cell or pot, thin the seedlings by snipping off the weaker one at the soil line. This will give the remaining seedling more room to grow.
Following these steps will increase your chances of successful germination and healthy seedling growth. Remember to be patient, as it can take anywhere from 5-14 days for tomato seeds to germinate.
The Importance of Light for Tomato Seedlings
Adequate light is crucial for healthy tomato seedling development. If seedlings don't receive enough light, they will become leggy and weak, making them more susceptible to diseases and pests. Leggy seedlings are characterized by long, thin stems and sparse leaves. They are often unable to support their own weight and tend to flop over.
Here are some tips for providing adequate light to your tomato seedlings:
Use Grow Lights: If you don't have a sunny windowsill, invest in a set of grow lights. LED grow lights are energy-efficient and provide a full spectrum of light that is ideal for plant growth. Position the lights a few inches above the seedlings and adjust the height as they grow. Rotate Seedlings Regularly: If you're using a windowsill, rotate the seedlings regularly to ensure they receive even light exposure on all sides. This will prevent them from leaning towards the light source. Supplemental Lighting: Even if you have a sunny windowsill, you may need to supplement natural light with grow lights during cloudy days or in areas with short day lengths. Consider the Light Spectrum: Tomatoes thrive under a combination of blue and red light. Blue light promotes leafy growth, while red light encourages flowering and fruiting. Full-spectrum LED grow lights offer both.
Troubleshooting Common Seed Starting Problems
Even with the best intentions, you may encounter some challenges when starting tomato seeds. Here are some common problems and how to address them:
Poor Germination: This could be due to old or low-quality seeds, improper soil temperature, or inconsistent moisture levels. Ensure your seeds are fresh, use a heat mat, and maintain consistent moisture. Damping Off: This fungal disease causes seedlings to rot at the soil line. Prevent it by using sterile seed starting mix, providing good air circulation, and avoiding overwatering. You can also use a fungicide specifically designed for damping off. Leggy Seedlings: This is usually caused by insufficient light. Provide more light by using grow lights or moving the seedlings to a sunnier location. You can also try burying the stems deeper when you transplant the seedlings. Nutrient Deficiencies: Seedlings may develop yellow or pale green leaves if they are not getting enough nutrients. Start feeding them with a diluted liquid fertilizer a few weeks after germination.
Hardening Off Your Tomato Seedlings
Before transplanting your tomato seedlings outdoors, it's essential to harden them off. This process gradually acclimates them to the outdoor environment, reducing the risk of shock and increasing their chances of survival. Hardening off typically takes about a week or two.
Here's how to harden off your tomato seedlings:
1.Start Gradually: Begin by placing the seedlings outdoors in a sheltered location (e.g., a porch or patio) for a few hours each day.
2.Increase Exposure: Gradually increase the amount of time the seedlings spend outdoors each day.
3.Protect from Harsh Weather: Protect the seedlings from strong winds, direct sunlight, and frost.
4.Monitor Moisture Levels: Check the soil moisture regularly and water as needed.
5.Bring Indoors if Necessary: If the weather turns unfavorable (e.g., heavy rain, frost), bring the seedlings back indoors.
6.Full Sun Exposure: After about a week or two, the seedlings should be able to tolerate full sun exposure.
Hardening off is a crucial step in the tomato-growing process. It will help your seedlings transition smoothly from the protected indoor environment to the challenging outdoor conditions.
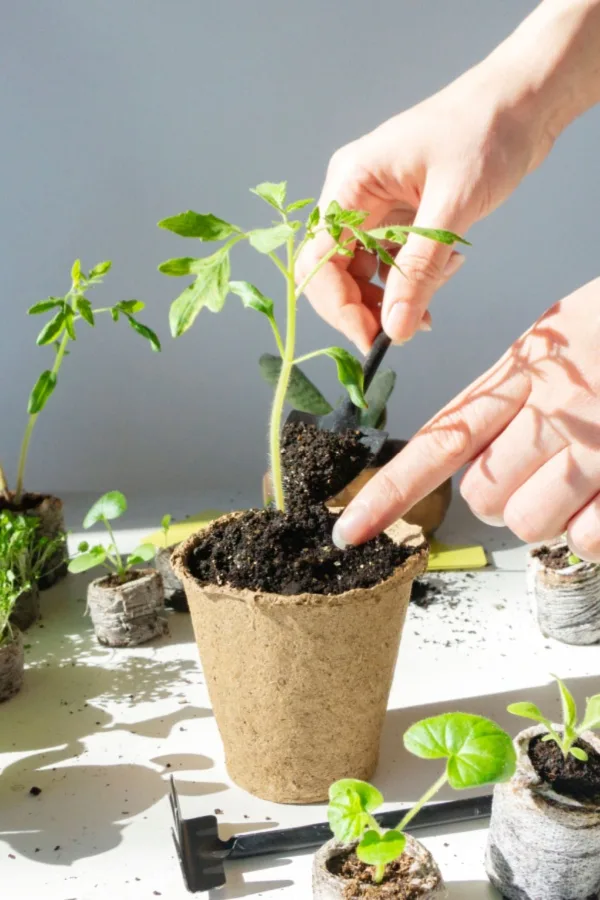
Transplanting Your Tomato Seedlings Outdoors
Once your tomato seedlings are hardened off and the weather is warm enough (soil temperature above 60°F or 15°C), it's time to transplant them into the garden. Choose a sunny location with well-drained soil. Amend the soil with compost or other organic matter to improve its fertility and drainage.
Here are some tips for transplanting your tomato seedlings:
1.Dig a Hole: Dig a hole that is slightly larger than the root ball of the seedling.
2.Remove Seedling: Gently remove the seedling from its container, being careful not to damage the roots.
3.Plant Deeply: Plant the tomato seedling deeply, burying the stem up to the first set of leaves. This will encourage the development of more roots along the buried stem.
4.Space Properly: Space the tomato plants according to their mature size. Determinate varieties can be spaced closer together than indeterminate varieties.
5.Water Thoroughly: Water the transplanted seedlings thoroughly to help them settle in.
6.Stake or Cage: Provide support for indeterminate tomato varieties by staking or caging them.
7.Mulch: Apply a layer of mulch around the base of the plants to help retain moisture and suppress weeds.
Transplanting your tomato seedlings is the final step in the process of growing tomatoes from seed to transplant. With proper care and attention, you'll soon be enjoying a bountiful harvest of delicious homegrown tomatoes.