Are you dreaming of juicy, sun-ripened tomatoes bursting with flavor, but lack the space or the time for a traditional garden? Or perhaps you're tired of constantly worrying about whether your tomato plants are getting enough water? Then, the world of self-watering containers might just be your gardening salvation! Let's dive in and explore how you can grow amazing tomatoes using this clever and convenient method. The Magic of Self Watering Containers for Tomato Plants Self-watering containers, sometimes called sub-irrigated planters (SIPs), are designed to provide a consistent and reliable water supply to your plants, minimizing the need for frequent watering and dramatically reducing water waste. For tomato plants, which are known for their thirstiness, this can be a game-changer! The beauty of a tomato plant self watering container lies in its simplicity and efficiency. It essentially creates a mini-reservoir beneath the soil, allowing the plant...
Imagine plucking sun-warmed, juicy cherry tomatoes straight from your patio, bursting with flavor that no store-bought tomato can match. Growing your own cherry tomatoes from seed in containers is easier than you think, even if you don't have a sprawling garden. It's a rewarding experience that brings fresh, delicious produce right to your doorstep. Let's dive into how you can make this a reality!
Why Grow Cherry Tomatoes From Seeds in Containers?
Growing cherry tomatoes from seed in containers offers a myriad of benefits. Firstly, it's incrediblyspace-saving. Perfect for apartment dwellers, balcony gardeners, or anyone with limited yard space. All you need is a sunny spot and a suitable container. Secondly, container gardening allows for greater control over soil quality and growing conditions. You can use a specially formulated potting mix that provides optimal drainage and nutrients. Thirdly, containers areportable. This means you can easily move your tomato plants to chase the sun or protect them from frost or harsh weather. Finally, growing from seed gives you a wider selection of varieties than you might find at your local nursery, and it's often more cost-effective. Starting your own cherry tomato seeds lets you choose heirloom varieties, and it gives you a head start on the growing season!
Advantages of Container Gardening for Cherry Tomatoes
The specific benefits of container gardening are worth emphasizing. Think of it like giving your cherry tomatoes a pampered, personalized spa treatment!
- Disease Control: Container gardening reduces the risk of soil-borne diseases, as you're using fresh, sterile potting mix.
- Pest Management: It's easier to monitor and control pests on container plants. A simple inspection can catch infestations early.
- Watering Efficiency: You can monitor the moisture levels in containers more closely, preventing overwatering or underwatering.
- Sunlight Optimization: Easily move containers to maximize sunlight exposure throughout the day. Cherry tomatoes crave sunshine!
- Soil Quality Control: Use a potting mix specifically designed for tomatoes, ensuring optimal nutrient availability and drainage.
Choosing the Right Cherry Tomato Variety
The world of cherry tomatoes is vast and delicious! Selecting the right variety for your container garden is crucial for success. Consider factors such as plant size, disease resistance, and, of course, taste! Some popular and reliable cherry tomato varieties that thrive in containers include:
- 'Sweet Million': A prolific producer of small, sweet, crack-resistant red cherry tomatoes.
- 'Sungold': Famous for its exceptionally sweet, golden-orange fruit. A real crowd-pleaser!
- 'Black Cherry': Unique, dark-colored tomatoes with a rich, complex flavor.
- 'Patio': A compact, determinate variety specifically bred for containers. Ideal for small spaces.
- 'Tiny Tim': An ultra-compact, dwarf variety perfect for very small containers or window boxes.
When making your selection, read seed packet descriptions carefully. Look for varieties labeled as "determinate" or "bush" if you want a more compact plant. "Indeterminate" varieties will require more support and pruning as they tend to grow taller and vining.
Starting Cherry Tomato Seeds Indoors
Starting cherry tomato seeds indoors gives you a significant head start on the growing season, especially in cooler climates. This allows you to enjoy ripe tomatoes sooner. Here's a step-by-step guide:
- Gather Your Supplies: You'll need seed starting trays or small pots, a high-quality seed starting mix, a spray bottle, a heat mat (optional), and a grow light (highly recommended).
- Sow the Seeds: Moisten the seed starting mix and fill your trays or pots. Sow the seeds about ¼ inch deep. Gently cover with soil and lightly water using a spray bottle to avoid disturbing the seeds.
- Provide Warmth and Light: Cherry tomato seeds germinate best in warm temperatures (70-80°F). Use a heat mat to maintain consistent warmth. Place the trays or pots under a grow light, ensuring the light is positioned a few inches above the soil surface. A reliable grow light system can be very beneficial in ensuring optimal plant growth and development. Speaking of which, you might want to explore something like the Ahopegarden Indoor Garden Hydroponics Growing System; this complete germination kit is designed to kickstart your plants with ease and includes a specialized LED grow light to maximize growth. You can find it here: https://amzn.to/3RPpa Sk.
- Keep the Soil Moist: Water regularly with a spray bottle or by bottom watering (placing the trays in a shallow dish of water and allowing the soil to absorb moisture). The soil should be consistently moist but not soggy.
- Harden Off Seedlings: Once the seedlings have developed several sets of true leaves (about 6-8 weeks after sowing), gradually acclimate them to outdoor conditions over a period of 7-10 days. This process, called "hardening off," involves exposing the seedlings to increasing amounts of sunlight and wind each day.
Troubleshooting Seed Starting Issues
Sometimes, things don't go as planned. Here are some common seed starting problems and how to fix them:
- Poor Germination: Ensure the seeds are fresh and viable. Check the expiration date on the seed packet. Maintain consistent moisture and warmth.
- Leggy Seedlings: This indicates insufficient light. Lower the grow light or move the seedlings to a sunnier location.
- Damping Off: A fungal disease that causes seedlings to collapse. Improve air circulation and avoid overwatering. Use a sterile seed starting mix.
Transplanting Cherry Tomato Seedlings into Containers
Once your seedlings have been hardened off, it's time to transplant them into their permanent containers. Choose a container that is at least 12 inches in diameter and depth, ideally larger for indeterminate varieties. Here's how to transplant:
- Prepare the Container: Fill the container with a high-quality potting mix specifically formulated for vegetables. Avoid using garden soil, as it can compact in containers and hinder drainage.
- Dig a Hole: Dig a hole in the center of the container that is large enough to accommodate the root ball of the seedling.
- Remove the Seedling: Gently remove the seedling from its tray or pot, being careful not to damage the roots.
- Plant the Seedling: Place the seedling in the hole and backfill with potting mix. Bury the stem up to the first set of leaves. This encourages the development of a stronger root system.
- Water Thoroughly: Water the transplanted seedling thoroughly to settle the soil.
Caring for Cherry Tomatoes in Containers
Consistent care is essential for thriving cherry tomato plants in containers. Here's what you need to know:
Sunlight
Cherry tomatoes need at least 6-8 hours of direct sunlight per day. Position your containers in a sunny location, such as a south-facing balcony or patio. If you don't have enough natural sunlight, consider supplementing with a grow light.
Watering
Water cherry tomatoes regularly, especially during hot weather. Check the soil moisture daily and water when the top inch feels dry. Water deeply, ensuring the entire root ball is moistened. Avoid overhead watering, as this can promote fungal diseases. Drip irrigation or a watering can with a long spout is ideal.
Pro Tip: A good way to check is to stick your finger about an inch into the soil. If it feels dry, it's time to water! You will probably need to water daily, especially in the hottest summer months.
Fertilizing
Cherry tomatoes are heavy feeders and require regular fertilization. Use a balanced fertilizer specifically formulated for tomatoes. Follow the instructions on the fertilizer label. Generally, fertilize every 2-3 weeks during the growing season.
What does NPK mean? NPK stands for Nitrogen (N), Phosphorus (P), and Potassium (K), which are the three macronutrients that plants need in the largest quantities. The numbers on a fertilizer label (e.g., 10-10-10) represent the percentage of each nutrient by weight.
Support
Indeterminate cherry tomato varieties need support to prevent them from sprawling and becoming damaged. Use stakes, cages, or trellises to provide support. Install the support structure when you transplant the seedlings to avoid disturbing the roots later.
Choosing the right support:
- Stakes: Simple and effective for smaller plants. Tie the stem to the stake with soft twine or plant ties.
- Cages: Provide all-around support and are ideal for bushy varieties.
- Trellises: Suitable for vining varieties. Train the vines to climb the trellis.
Pruning
Pruning is essential for indeterminate cherry tomato varieties to improve air circulation, promote fruit production, and control plant size. Remove suckers (the shoots that grow in the junction between the main stem and a branch) regularly. Prune away any yellowing or diseased leaves.
Tip: Pruning encourages the plant to put its energy into fruit production rather than foliage growth!
Dealing with Pests and Diseases
Even in containers, cherry tomatoes can be susceptible to pests and diseases. Here are some common problems and how to address them:
- Aphids: Small, sap-sucking insects that can weaken plants. Spray with insecticidal soap or neem oil.
- Tomato Hornworms: Large, green caterpillars that can defoliate plants. Handpick them off the plants.
- Whiteflies: Tiny, white insects that feed on plant sap. Spray with insecticidal soap or neem oil.
- Early Blight: A fungal disease that causes dark spots on leaves. Remove infected leaves and spray with a fungicide.
- Blossom End Rot: A physiological disorder caused by calcium deficiency. Ensure consistent watering and amend the soil with calcium-rich fertilizer or bone meal.
Prevention is key! Inspect your plants regularly for signs of pests or diseases. Practice good sanitation by removing fallen leaves and debris. Provide good air circulation to prevent fungal diseases.
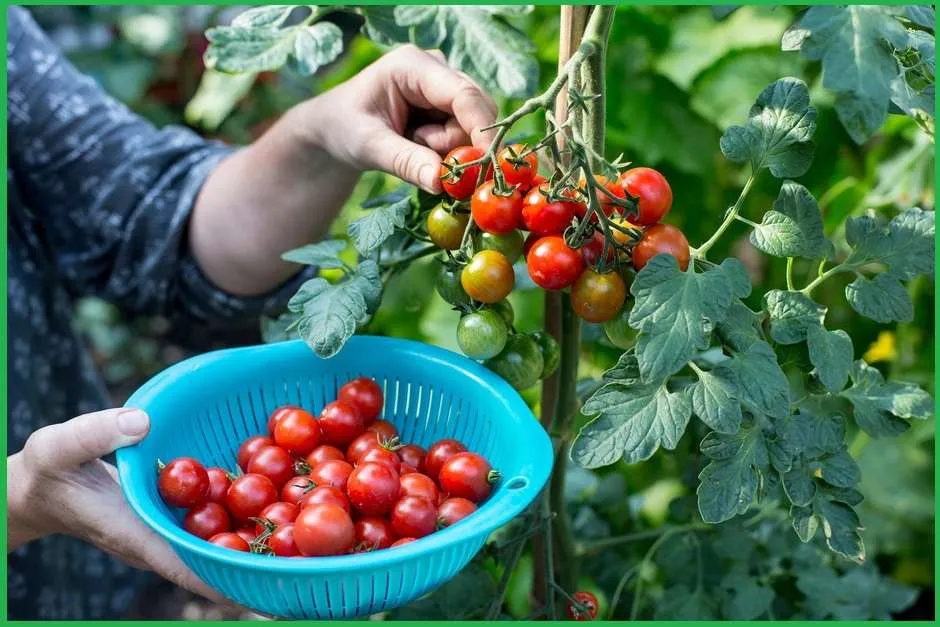
Harvesting Cherry Tomatoes
The most rewarding part of growing cherry tomatoes is, of course, the harvest! Cherry tomatoes are typically ready to harvest about 60-80 days after transplanting. Look for fruits that are fully colored and slightly soft to the touch. Gently twist or clip the tomatoes from the vine.
Don't wait too long! Overripe tomatoes can crack or become mushy. Harvest regularly to encourage continued fruit production.
Growing cherry tomatoes from seed in containers is a fun and rewarding experience that anyone can enjoy. With a little planning and care, you'll be harvesting delicious, homegrown tomatoes in no time! Enjoy your bounty!