Are you dreaming of juicy, sun-ripened tomatoes bursting with flavor, but lack the space or the time for a traditional garden? Or perhaps you're tired of constantly worrying about whether your tomato plants are getting enough water? Then, the world of self-watering containers might just be your gardening salvation! Let's dive in and explore how you can grow amazing tomatoes using this clever and convenient method. The Magic of Self Watering Containers for Tomato Plants Self-watering containers, sometimes called sub-irrigated planters (SIPs), are designed to provide a consistent and reliable water supply to your plants, minimizing the need for frequent watering and dramatically reducing water waste. For tomato plants, which are known for their thirstiness, this can be a game-changer! The beauty of a tomato plant self watering container lies in its simplicity and efficiency. It essentially creates a mini-reservoir beneath the soil, allowing the plant...
So, you've nurtured your tomato seedlings to a vibrant start in your Aero Garden, and now they're practically bursting at the seams, eager to stretch their roots into some real soil. Don't worry, the transition from hydroponics to the garden doesn't have to be a nail-biting experience! With a little planning and some gentle care, you can successfully transplant your Aero Garden tomato plants and watch them thrive. Let's dive into how to make this move as smooth as possible for your precious little plants.
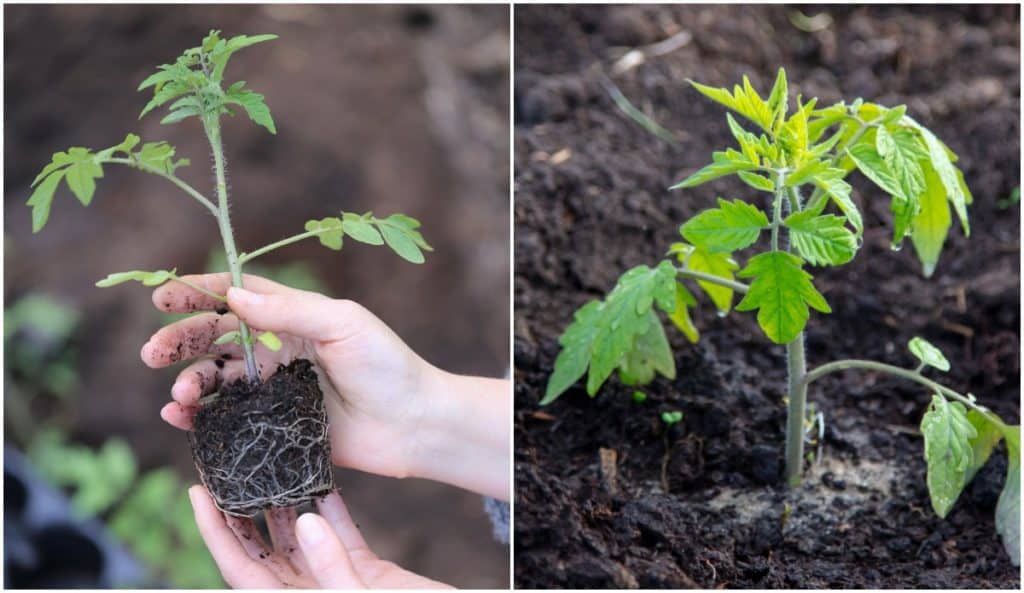
When to Transplant Aero Garden Tomato Plants
Knowingwhento transplant is just as crucial as knowinghow. Rushing the process, or waiting too long, can stress your tomato plants and impact their future growth and fruit production. Here's what to look for:
Size Matters: Seedling Maturity
The ideal time to transplant your Aero Garden tomato plants is when they've reached a certain level of maturity. You're looking for seedlings that are strong and well-developed. Generally, this means:
- They have several sets of true leaves (not just the initial cotyledons, or seed leaves). Aim for at least 4-6 true leaves.
- They are about 6-8 inches tall.
- Their root systems are well-established within the Aero Garden pod but not overly root-bound. If roots are circling tightly around the pod, it's definitely time to transplant!
External Conditions: Checking the Weather
Equally important is the weather outside. Tomatoes are warm-season crops, and they are frost-sensitive. Here are some factors to consider:
- Temperature: The soil temperature should be consistently above 60°F (15°C). Nighttime temperatures should remain above 50°F (10°C).
- Frost: All danger of frost must have passed. A late frost can kill your young tomato plants.
- Timing: In most regions, this means transplanting after the last expected frost date in spring. Check your local weather forecasts and historical data to determine the safest time for transplanting.
A good rule of thumb is to wait until a week or two after your region's average last frost date to ensure that the soil is warm enough and that there's no risk of a surprise frost. This gives your tomato plants the best possible start in their new home.
Hardening Off: Preparing for the Great Outdoors
Before you move your tomato plants permanently outdoors, you need to "harden them off." This process gradually acclimates them to the harsher conditions outside, such as stronger sunlight, wind, and temperature fluctuations. Without hardening off, your plants can experience transplant shock, which can stunt their growth or even kill them.
Here's how to harden off your Aero Garden tomato plants:
- Start a week or two before you plan to transplant.
- Place your Aero Garden near a window that receives direct sunlight for a few hours each day.
- Begin by exposing the seedlings to the outdoors for just 1-2 hours in a sheltered location (e.g., a porch or patio) protected from wind and direct sun.
- Gradually increase the amount of time the plants spend outdoors each day, adding an hour or two each time.
- Also, gradually expose them to more direct sunlight as they become acclimated.
- By the end of the hardening-off period, your tomato plants should be able to tolerate a full day of outdoor conditions.
Preparing for the Transplant: Essential Supplies
Having the right tools and materials on hand will make the transplanting process much smoother and increase your chances of success. Think of it like preparing a birthing suite for your plant babies!
Choosing the Right Location
Tomatoes are sun-loving plants, so select a location that receives at least 6-8 hours of direct sunlight per day. The soil should be well-draining and rich in organic matter. Avoid areas where water tends to pool after rain, as this can lead to root rot.
If your soil is poor, consider amending it with compost, well-rotted manure, or other organic amendments. A soil test can also help you determine if your soil is lacking any essential nutrients. Ideally, the soil p H should be between 6.0 and
6.8.
Gather Your Tools and Supplies
Here's a list of essential supplies you'll need for transplanting your Aero Garden tomato plants:
- Gardening gloves: To protect your hands.
- Trowel or shovel: For digging holes.
- Watering can or hose: For watering the plants.
- Compost or other organic matter: To enrich the soil.
- Tomato stakes or cages: To support the plants as they grow.
- Optional: Rooting hormone (to encourage root growth), fertilizer (starter fertilizer low in nitrogen).
Preparing the Soil
Dig a hole that is slightly larger than the Aero Garden pod or root ball of the tomato plant. Mix some compost or other organic matter into the soil at the bottom of the hole. This will provide the plant with essential nutrients and improve drainage. Water the hole well before planting. This pre-watering helps settle the soil and provides moisture to the roots immediately after transplanting.
Spacing is also key. Space your tomato plants at least 2-3 feet apart, depending on the variety. Determinate (bush) varieties can be planted closer together than indeterminate (vining) varieties. Proper spacing allows for good air circulation, which helps prevent diseases.
The Transplant Process: Step-by-Step Guide
Now comes the moment of truth! Follow these steps carefully to transplant your Aero Garden tomato plants successfully:
Removing the Seedling from the Aero Garden
Gently remove the tomato seedling from the Aero Garden pod. Be careful not to damage the roots. If the roots are tightly bound, you can gently loosen them with your fingers or a small tool. Consider soaking the pod in water for a few minutes beforehand to make removal easier.
Planting the Seedling
Place the tomato seedling in the prepared hole, ensuring that the top of the root ball is level with the surrounding soil. Backfill the hole with soil, gently patting it down around the plant. Avoid burying the stem too deeply, as this can encourage stem rot. However, tomatoes can form roots along their buried stems, so burying the first set of leaves can be beneficial in some cases.
Watering and Initial Care
Water the newly transplanted tomato plant thoroughly. This helps settle the soil around the roots and provides the plant with essential moisture. You may also want to apply a diluted solution of rooting hormone to encourage root growth.
Stake or cage the tomato plant immediately after planting. This will provide support as the plant grows and prevent the fruit from weighing down the branches. Water the plant regularly, especially during dry periods. Avoid overwatering, as this can lead to root rot.
Post-Transplant Care: Helping Your Tomatoes Thrive
Once your tomato plants are in the ground, there are a few things you can do to help them thrive:
Watering and Fertilizing
Water deeply but infrequently, allowing the soil to dry out slightly between waterings. Avoid overhead watering, as this can encourage fungal diseases. Instead, water at the base of the plant.
Fertilize your tomato plants regularly with a balanced fertilizer. Follow the instructions on the fertilizer package. You may also want to side-dress the plants with compost or other organic matter throughout the growing season.
Pruning and Support
Prune your tomato plants regularly to remove suckers (the shoots that grow between the main stem and the branches). This will improve air circulation and encourage fruit production. Indeterminate varieties require more pruning than determinate varieties.
Continue to provide support for your tomato plants as they grow. Adjust the stakes or cages as needed to accommodate the plant's increasing size and weight.
Pest and Disease Control
Keep an eye out for pests and diseases. Common tomato pests include aphids, tomato hornworms, and whiteflies. Common diseases include early blight, late blight, and blossom end rot. Treat any problems promptly to prevent them from spreading.
Consider using organic pest and disease control methods whenever possible. For example, you can attract beneficial insects to your garden by planting companion plants. You can also use insecticidal soap or neem oil to control pests. For diseases, you can use copper-based fungicides or baking soda sprays.
Following these tips will help you successfully transplant your Aero Garden tomato plants and enjoy a bountiful harvest of delicious, homegrown tomatoes!
If you are looking for a similar growing experience, consider the Ahopegarden Indoor Garden Hydroponics Growing System, it's like having a mini Aero Garden! TheAhopegarden aeroponic herb garden offers 10 pods and an LED grow light. You can find it on Amazon: https://amzn.to/3RPpa Sk.