Are you dreaming of juicy, sun-ripened tomatoes bursting with flavor, but lack the space or the time for a traditional garden? Or perhaps you're tired of constantly worrying about whether your tomato plants are getting enough water? Then, the world of self-watering containers might just be your gardening salvation! Let's dive in and explore how you can grow amazing tomatoes using this clever and convenient method. The Magic of Self Watering Containers for Tomato Plants Self-watering containers, sometimes called sub-irrigated planters (SIPs), are designed to provide a consistent and reliable water supply to your plants, minimizing the need for frequent watering and dramatically reducing water waste. For tomato plants, which are known for their thirstiness, this can be a game-changer! The beauty of a tomato plant self watering container lies in its simplicity and efficiency. It essentially creates a mini-reservoir beneath the soil, allowing the plant...
Imagine biting into a juicy, sun-ripened tomato, the taste exploding in your mouth. Now, imagine growing that exact tomato yourself, from a tiny seed saved right from the fruit you just enjoyed. Sounds amazing, right? Well, it's easier than you might think! Let's explore the simple and rewarding process of growing tomatoes from seed, unlocking a world of delicious possibilities right in your own backyard (or windowsill!).
Why Grow Tomatoes from Seed?
There are numerous reasons why starting your own tomato plants from seed is a fantastic idea. First and foremost, it grants you access to a much wider variety of tomato types than you'd typically find at your local garden center. Heirloom varieties, unique colors, and tomatoes with specific flavor profiles become readily available to you. Think vibrant purple Cherokee Purples, sweet and tangy Green Zebras, or the classic, beefy Brandywine. Growingtomato seeds gives you control over the kind of tomatoes that you will eventually grow.
Beyond variety, growing from seed is incredibly cost-effective. A single packet of tomato seeds can yield dozens of plants, significantly reducing the expense compared to purchasing individual seedlings. You can buytomato seed packets for a very low price, but the benefits will be high!
Furthermore, the process of nurturing a tomato plant from its earliest stages is deeply satisfying. Witnessing the germination, the emergence of true leaves, and the steady growth of your plant fosters a connection with nature and a sense of accomplishment. And, let's be honest, there's something undeniably cool about saying you grew those delicious tomatoes entirely from scratch!
Selecting Your Tomatoes for Seed Saving
Not all tomatoes are created equal when it comes to seed saving. The most important factor is choosingheirloom oropen-pollinated varieties. These types of tomatoes reliably produce seeds that will grow into plants similar to the parent plant. Hybrid tomatoes (often labeled "F1") may not breed true, meaning the seeds you save could result in plants with unexpected characteristics.
To ensure the seeds are viable and of good quality, select healthy, ripe tomatoes from plants that exhibited desirable traits, such as disease resistance, high yields, and exceptional flavor. Avoid taking seeds from tomatoes that show signs of disease or rot.
Here's a quick table summarizing the difference:
| Variety Type | Seed Saving Feasibility | Plant Characteristics |
|---|---|---|
| Heirloom/Open-Pollinated | Excellent - Seeds will produce similar plants | Consistent traits from generation to generation |
| Hybrid (F1) | Not Recommended - Seeds may not breed true | Traits may vary, unpredictable results |
The Step-by-Step Guide to Extracting Tomato Seeds
Extracting tomato seeds is a straightforward process, though it does require a bit of patience and attention to detail. This is the process that enables you togrow seeds from tomatoes at home and save money!
Step 1: Fermentation
The fermentation process is crucial for removing the gelatinous coating around the tomato seeds. This coating contains germination inhibitors that can hinder successful sprouting. Fermentation also helps to kill off certain seed-borne diseases.
To ferment your tomato seeds:
- Scoop out the seeds and pulp from your chosen tomatoes into a clean jar or container.
- Add a small amount of water (about half as much as the tomato pulp).
- Leave the jar uncovered (but away from fruit flies!) at room temperature for 3-5 days.
- Stir the mixture daily. You'll notice a layer of mold forming on the surface – this is a good sign! It indicates that fermentation is taking place.
Step 2: Separating the Seeds
After fermentation, the good seeds will sink to the bottom of the jar, while the pulp and any remaining seed coating will float. Carefully pour off the moldy water and floating debris. Add more water to the jar, swirl the contents, and pour off again. Repeat this process until only clean seeds remain at the bottom.
Step 3: Drying the Seeds
Spread the clean seeds in a single layer on a non-stick surface, such as a coffee filter, paper towel, or a ceramic plate. Ensure good air circulation to prevent mold growth. Allow the seeds to dry completely for 1-2 weeks in a cool, dry place, away from direct sunlight. The seeds should be hard and brittle when they are fully dry.
Step 4: Storing the Seeds
Once the seeds are thoroughly dry, store them in an airtight container, such as a glass jar or a sealed envelope. Label the container with the tomato variety and the date of collection. Store the seeds in a cool, dark, and dry place, such as a refrigerator or freezer. Properly stored tomato seeds can remain viable for 4-5 years or even longer.
Starting Tomato Seeds Indoors
Starting tomato seeds indoors gives you a head start on the growing season, especially in regions with short summers. This is the best way togrow seeds from tomatoes and harvest tomatoes as early as possible.
When to Start Seeds
The ideal time to start tomato seeds indoors is typically 6-8 weeks before the last expected frost date in your area. You can find your local frost dates online or by consulting your local agricultural extension office. For example, if your last frost date is May 15th, you should start your seeds around late March or early April.
Materials Needed
- Tomato seeds
- Seed starting trays or small pots
- Seed starting mix (a lightweight, sterile soil mix)
- Watering can or spray bottle
- Heat mat (optional, but recommended for faster germination)
- Grow lights (essential for strong, healthy seedlings)
Sowing the Seeds
- Moisten the seed starting mix thoroughly.
- Fill the seed starting trays or pots with the moistened mix.
- Sow 2-3 seeds per cell or pot, about 1/4 inch deep.
- Gently cover the seeds with more seed starting mix.
- Water gently to avoid disturbing the seeds.
- Cover the trays or pots with a clear plastic dome or plastic wrap to create a humid environment.
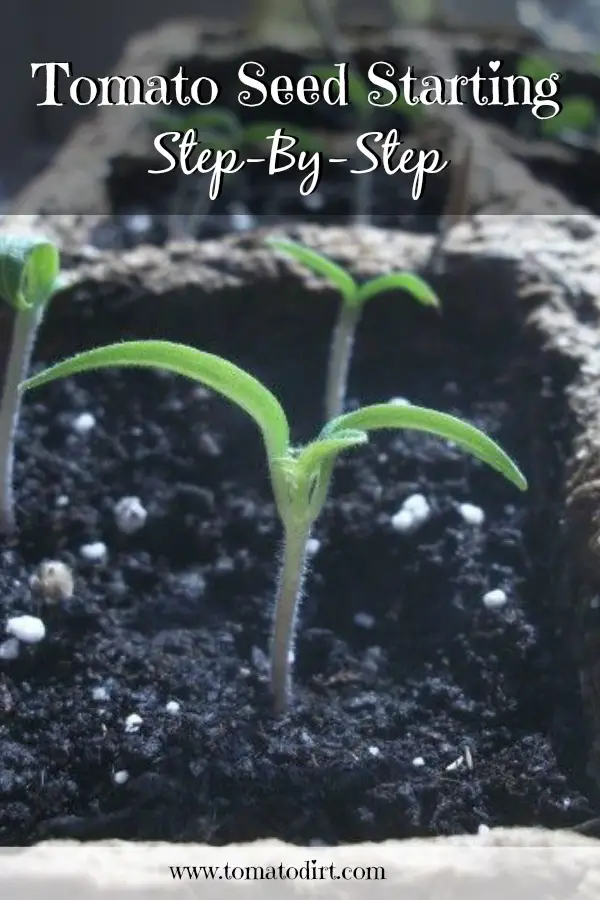
Germination and Seedling Care
Place the seed starting trays or pots on a heat mat in a warm location (around 75-85°F). The seeds should germinate within 5-10 days. Once the seedlings emerge, remove the plastic dome and place them under grow lights. Position the grow lights a few inches above the seedlings and keep them on for 14-16 hours per day.
Water the seedlings regularly, keeping the soil moist but not waterlogged. Once the seedlings have developed their first set of true leaves (the leaves that look like miniature tomato leaves), thin them to one plant per cell or pot. Choose the strongest, healthiest seedling to keep.
As the seedlings grow, gradually move the grow lights further away to prevent them from burning. You might find this to be a very rewarding activity, as yougrow seeds from tomatoes and watch them grow everyday.
Transplanting Tomato Seedlings Outdoors
Before transplanting your tomato seedlings outdoors, it's essential to harden them off. This process gradually acclimates the seedlings to the outdoor environment, reducing the risk of transplant shock.
Hardening Off
About 1-2 weeks before your last expected frost date, begin hardening off your tomato seedlings. Start by placing them outdoors in a sheltered location for a few hours each day, gradually increasing the amount of time they spend outside. Protect them from direct sunlight, strong winds, and cold temperatures. After a week or two, they should be able to tolerate full sun and overnight temperatures down to around 50°F.
Transplanting
Choose a sunny location with well-drained soil for your tomato plants. Amend the soil with compost or other organic matter to improve its fertility and drainage. Dig a hole slightly larger than the root ball of the seedling. Gently remove the seedling from its container and loosen the roots. Plant the seedling deep, burying the stem up to the first set of leaves. This will encourage the plant to develop a stronger root system.
Space the tomato plants 2-3 feet apart, depending on the variety. Water the plants thoroughly after transplanting. Add a layer of mulch around the base of the plants to help retain moisture, suppress weeds, and regulate soil temperature.
Ongoing Care for Tomato Plants
Once your tomato plants are established outdoors, they require regular care to thrive and produce a bountiful harvest.
Watering
Water tomato plants deeply and regularly, especially during dry periods. Aim for about 1-2 inches of water per week. Water at the base of the plant to avoid wetting the foliage, which can increase the risk of disease.
Fertilizing
Fertilize tomato plants regularly with a balanced fertilizer. Follow the instructions on the fertilizer label. You can also use organic fertilizers, such as compost tea or fish emulsion.
Pruning
Prune tomato plants to improve air circulation, reduce disease risk, and encourage fruit production. Remove suckers (the small shoots that grow in the crotch between the stem and a branch) on indeterminate tomato varieties. Determinate tomato varieties generally do not require pruning.
Supporting
Provide support for tomato plants to prevent them from sprawling on the ground. Use stakes, cages, or trellises to support the plants. This will also make it easier to harvest the tomatoes.
Pest and Disease Control
Monitor tomato plants regularly for pests and diseases. Common tomato pests include aphids, tomato hornworms, and whiteflies. Common tomato diseases include early blight, late blight, and blossom end rot. Take steps to control pests and diseases as needed. Organic pest and disease control methods include using insecticidal soap, neem oil, and copper fungicide. Growing healthy tomato plants is all about having a good start, and you can do this when yougrow seeds from tomatoes yourself.
Troubleshooting Common Issues
Even with the best care, tomato plants can sometimes encounter problems. Here are some common issues and how to address them:
- Blossom End Rot: Caused by calcium deficiency. Ensure consistent watering and add calcium to the soil.
- Early Blight: A fungal disease that causes brown spots on the leaves. Remove infected leaves and apply a copper fungicide.
- Tomato Hornworms: Large green caterpillars that can defoliate tomato plants. Handpick them off the plants or use Bacillus thuringiensis (Bt).
Don't be discouraged by these challenges! With a little knowledge and persistence, you can overcome these issues and enjoy a bountiful tomato harvest.
Ready to get your seed starting journey underway? For a convenient and efficient method to kickstart your garden, consider using seed starter trays. ASeed Starter Tray is what you need to grow your very own tomatoes! Check out this self-watering kit with a humidity dome, a 5-pack of 60-cell plant seedling trays that are reusable germination trays for indoor gardening seed growing starting. You can find it on Amazon here: Seed Starter Trays Self-Watering - Kit with Humidity Dome.