Are you dreaming of juicy, sun-ripened tomatoes bursting with flavor, but lack the space or the time for a traditional garden? Or perhaps you're tired of constantly worrying about whether your tomato plants are getting enough water? Then, the world of self-watering containers might just be your gardening salvation! Let's dive in and explore how you can grow amazing tomatoes using this clever and convenient method. The Magic of Self Watering Containers for Tomato Plants Self-watering containers, sometimes called sub-irrigated planters (SIPs), are designed to provide a consistent and reliable water supply to your plants, minimizing the need for frequent watering and dramatically reducing water waste. For tomato plants, which are known for their thirstiness, this can be a game-changer! The beauty of a tomato plant self watering container lies in its simplicity and efficiency. It essentially creates a mini-reservoir beneath the soil, allowing the plant...
There's nothing quite like biting into a sun-ripened, juicy tomato you've grown yourself. The flavour is simply unmatched. But the journey from tiny seed to delicious fruit can seem daunting. Don't worry! I'm here to guide you through the best way to plant tomatoes from seed, ensuring you'll be enjoying your homegrown harvest in no time.
The Ultimate Guide: Best Way to Plant Tomatoes from Seed
Starting tomatoes from seed allows you to choose from a wider variety of options than you'll typically find at your local garden center. Plus, it's incredibly rewarding to nurture a plant from its earliest stages. This comprehensive guide will cover everything you need to know, from selecting the right seeds to transplanting your seedlings outdoors. Let's dive in!
Choosing the Right Tomato Seeds
The first step in your tomato-growing adventure is selecting the right seeds. Consider your climate, growing space, and personal preferences when making your selection. There are two main types of tomatoes: determinate and indeterminate.
Determinate Tomatoes: These tomatoes grow to a fixed size, usually around 3-4 feet tall, and produce all their fruit at once. They are ideal for canning and making sauces. Popular determinate varieties include Roma, Celebrity, and Rutgers. Determinate tomatoes are great for people who want one big harvest, perfect for preserving and canning. They are also a better option if you have limited space since they don't sprawl as much as indeterminate varieties.
Indeterminate Tomatoes: These tomatoes continue to grow and produce fruit throughout the growing season. They require staking or caging to support their growth, which can reach 6-8 feet or even taller! Popular indeterminate varieties include Beefsteak, Brandywine, and Cherry tomatoes. Indeterminate tomatoes offer a continuous supply of fresh tomatoes throughout the summer and fall. They are perfect for salads, sandwiches, and snacking straight from the vine.
In addition to the type of tomato, also consider disease resistance. Look for seed packets labeled with abbreviations like V (Verticillium wilt), F (Fusarium wilt), N (Nematodes), and T (Tobacco Mosaic Virus). These resistances can help protect your plants from common tomato diseases. Think about the flavors you prefer. Do you like sweet cherry tomatoes, or the tart tang of an heirloom variety? Read seed descriptions carefully to help you choose the varieties that will best suit your tastes. Sourcing your seeds from reputable seed companies can improve your germination success rate.
Heirloom vs. Hybrid Tomato Seeds
When choosing seeds, you'll also encounter the terms "heirloom" and hybrid.Understanding the difference is important.
Heirloom Tomatoes: These are open-pollinated varieties that have been passed down through generations, often for 50 years or more. They are known for their unique flavors, colors, and shapes. Heirlooms typically breed true, meaning you can save seeds from their fruit and expect the offspring to be similar to the parent plant. However, they may be more susceptible to diseases than hybrid varieties.
Hybrid Tomatoes: These are created by cross-pollinating two different parent plants to combine their desirable traits, such as disease resistance, yield, and fruit size. Hybrid seeds will often have "F1" on the seed packet, which designates the first generation of the cross. While hybrids may offer improved performance, they don't always breed true, so saving seeds from their fruit may not produce the same results.
Consider both options, depending on your goals. If you want to save seeds or appreciate unique flavors, go for heirloom varieties. If you are looking for reliable performance and disease resistance, hybrid seeds might be a better choice.
The Best Time to Start Tomato Seeds
Timing is everything when it comes to starting tomato seeds. The best time to start your seeds indoors is typically 6-8 weeks before the last expected frost in your area. You can find the average last frost date for your region by checking with your local agricultural extension office or online resources like the Farmer's Almanac. Starting too early can result in leggy, stressed seedlings, while starting too late can delay your harvest. Use a seed starting calendar or a seed starting date calculator to determine the optimal timing.
For example, if your last expected frost date is May 15th, you should start your tomato seeds indoors around March 20th to April 5th. This timing allows the seedlings to develop a strong root system and healthy foliage before being transplanted outdoors. Always consider the specific needs of the tomato variety you are growing; some varieties may benefit from a slightly earlier or later start.
Materials You'll Need to Start Tomato Seeds
Before you begin, gather all the necessary materials. Here's a list of essentials:
Tomato Seeds: Choose your desired varieties from a reputable source. Seed Starting Trays or Containers: These should have drainage holes to prevent waterlogging. Seed Starting Mix: This is a lightweight, sterile mix specifically formulated for seed germination. Avoid using garden soil, as it can contain pathogens and weed seeds. Watering Can or Spray Bottle: Use a gentle watering method to avoid disturbing the delicate seedlings. Heat Mat (Optional): Provides consistent bottom heat to speed up germination. Grow Light: Essential for providing adequate light to prevent leggy seedlings. Labels: To keep track of your different tomato varieties. Small Pots: For transplanting seedlings once they have developed their first true leaves. Fertilizer:A diluted, balanced fertilizer for feeding seedlings after transplanting.
These materials will provide a great head start to successfully growing tomatoes from seed. Investing in quality materials will pay off in the long run with healthier and more productive plants.
Step-by-Step Guide: Planting Tomato Seeds Indoors
Now for the fun part! Follow these steps for the best way to plant tomatoes from seed:
1.Prepare the Seed Starting Trays: Fill your seed starting trays or containers with seed starting mix, leaving about half an inch of space at the top. Gently tap the trays to settle the mix.
2.Sow the Seeds: Make a small indentation (about 1/4 inch deep) in the center of each cell or container. Place 2-3 tomato seeds in each indentation. This increases the chances of at least one seed germinating in each cell.
3.Cover the Seeds: Gently cover the seeds with a thin layer of seed starting mix. Lightly water the trays with a spray bottle or watering can to moisten the soil.
4.Provide Warmth and Humidity: Cover the trays with a clear plastic dome or plastic wrap to create a humid environment. Place the trays on a heat mat if using. The ideal soil temperature for tomato seed germination is between 75-85°F (24-29°C).
5.Monitor Germination: Check the trays daily for germination. Tomato seeds typically germinate within 5-10 days. Once the seeds have sprouted, remove the plastic dome or wrap to allow for better air circulation.
6.Provide Adequate Light: Place the trays under a grow light. Position the light a few inches above the seedlings and adjust the height as they grow. Provide 14-16 hours of light per day.
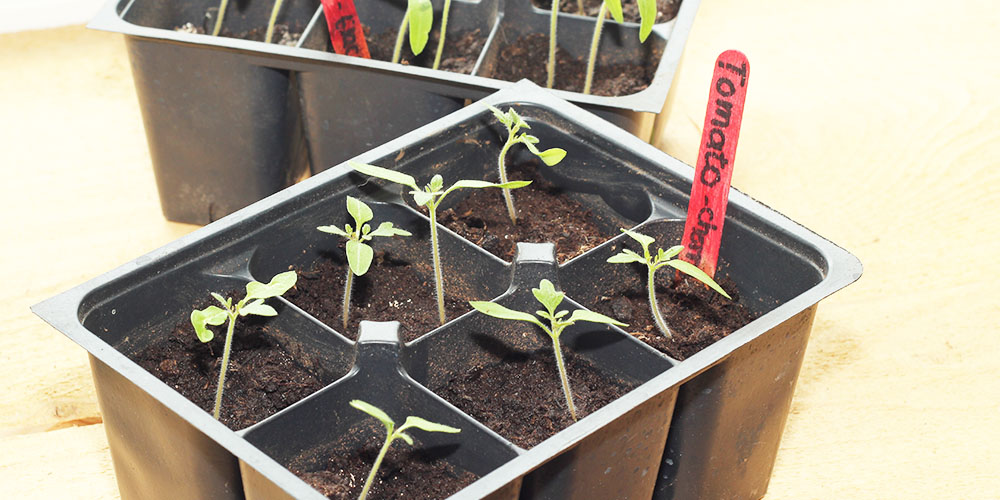
7.Thin the Seedlings: Once the seedlings have developed their first true leaves (the second set of leaves that appear after the cotyledons), thin them by snipping off the weaker seedlings at the soil line with scissors. Leave the strongest seedling in each cell.
8.Water Regularly: Keep the soil consistently moist, but not waterlogged. Water from the bottom by placing the trays in a shallow dish of water and allowing the soil to absorb the moisture.
9.Fertilize Seedlings: Start fertilizing the seedlings with a diluted, balanced fertilizer (e.g., 10-10-10) about two weeks after they have been thinned. Follow the instructions on the fertilizer label for dilution rates.
By following these steps, you will give your tomato seeds the best possible start, resulting in strong and healthy seedlings ready for transplanting into the garden.
Hardening Off Tomato Seedlings
Before transplanting your tomato seedlings outdoors, it's essential to harden them off. Hardening off is the process of gradually acclimating the seedlings to outdoor conditions. This helps them adjust to changes in temperature, sunlight, and wind, preventing transplant shock. Start the hardening off process about one week before you plan to transplant your seedlings.
Begin by placing the seedlings outdoors in a sheltered location (e.g., a shaded patio or porch) for just a couple of hours each day. Gradually increase the amount of time they spend outdoors each day, exposing them to more sunlight and wind. Over the course of the week, also reduce the frequency of watering slightly. By the end of the week, the seedlings should be able to tolerate a full day outdoors in direct sunlight. If you notice the seedlings wilting or showing signs of stress, bring them back indoors or provide shade immediately.
Transplanting Tomato Seedlings Outdoors
Once your tomato seedlings are hardened off and the danger of frost has passed, it's time to transplant them into the garden. Choose a sunny location that receives at least 6-8 hours of direct sunlight per day. Tomatoes prefer well-drained soil that is rich in organic matter. Amend the soil with compost or well-rotted manure before planting.
Dig a hole that is slightly larger than the root ball of the seedling. Gently remove the seedling from its pot, being careful not to damage the roots. Place the seedling in the hole and backfill with soil. Bury the stem of the tomato plant up to the first set of leaves. This encourages the development of additional roots along the buried stem, resulting in a stronger and healthier plant. Space the tomato plants according to the recommendations for the variety you are growing (typically 2-3 feet apart for determinate varieties and 3-4 feet apart for indeterminate varieties).
Water the newly transplanted seedlings thoroughly and apply a layer of mulch around the base of the plants to help retain moisture and suppress weeds. Provide support for indeterminate tomato varieties by staking or caging them at the time of planting. Protect the seedlings from pests such as cutworms by placing a cardboard collar around the base of each plant. With proper care and attention, your tomato plants will thrive and produce a bountiful harvest of delicious, homegrown tomatoes.
Caring for Tomato Plants After Transplanting
After transplanting, consistent care is key to a successful tomato harvest. Here are some important aspects of tomato plant care:
Watering: Water deeply and regularly, especially during hot, dry weather. Aim to keep the soil consistently moist, but not waterlogged. Avoid overhead watering, as this can promote fungal diseases. Use a soaker hose or drip irrigation system to water at the base of the plants.
Fertilizing: Fertilize tomato plants regularly throughout the growing season with a balanced fertilizer or a fertilizer specifically formulated for tomatoes. Follow the instructions on the fertilizer label for application rates and frequency.
Pruning: Prune indeterminate tomato varieties to remove suckers (the small shoots that grow between the main stem and the branches). This helps to improve air circulation and focus the plant's energy on fruit production. Determinate tomatoes generally do not need pruning.
Pest and Disease Control: Monitor your tomato plants regularly for signs of pests and diseases. Common tomato pests include aphids, tomato hornworms, and whiteflies. Common tomato diseases include early blight, late blight, and blossom end rot. Take action promptly to control pests and diseases, using organic or conventional methods as appropriate.
Support: Provide adequate support for indeterminate tomato varieties by staking, caging, or trellising them. This prevents the plants from sprawling on the ground and keeps the fruit clean and off the soil.
By providing proper care and attention, you can ensure a healthy and productive tomato harvest. With a little effort, you'll be enjoying delicious, homegrown tomatoes all summer long.
Want to skip a step and get a head start? Consider a hydroponic system for starting your seeds! The Ahopegarden Indoor Garden Hydroponics Growing System with its 10-pod capacity is a fantastic indoor garden kit to help with plant germination. You can even use the aeroponic herb and vegetable growth lamp to grow lettuce and other vegetables right on your countertop!