Are you dreaming of juicy, sun-ripened tomatoes bursting with flavor, but lack the space or the time for a traditional garden? Or perhaps you're tired of constantly worrying about whether your tomato plants are getting enough water? Then, the world of self-watering containers might just be your gardening salvation! Let's dive in and explore how you can grow amazing tomatoes using this clever and convenient method. The Magic of Self Watering Containers for Tomato Plants Self-watering containers, sometimes called sub-irrigated planters (SIPs), are designed to provide a consistent and reliable water supply to your plants, minimizing the need for frequent watering and dramatically reducing water waste. For tomato plants, which are known for their thirstiness, this can be a game-changer! The beauty of a tomato plant self watering container lies in its simplicity and efficiency. It essentially creates a mini-reservoir beneath the soil, allowing the plant...
Imagine biting into a juicy, sun-ripened cherry tomato, bursting with flavor, long before the traditional growing season even begins. Sound appealing? You can make this a reality by learning how to start your cherry tomato seeds indoors. It's easier than you might think, and the reward of homegrown, fresh tomatoes is well worth the effort. Let's dive into the simple steps to get you started on your indoor gardening journey!
Why Start Cherry Tomato Seeds Indoors?
Starting cherry tomato seeds indoors offers several advantages over directly sowing them in the garden. Primarily, it gives you a significant head start on the growing season. By starting your seeds indoors 6-8 weeks before the last expected frost, you can have strong, healthy seedlings ready to transplant outdoors as soon as the weather warms up. This translates to earlier harvests and a longer period to enjoy those delicious cherry tomatoes.
Beyond an earlier harvest, indoor seed starting also provides a more controlled environment. You can regulate temperature, humidity, and light, which are crucial factors for successful germination and seedling development. This control minimizes the risk of losing your seedlings to pests, diseases, or unfavorable weather conditions like late frosts or heavy rains. Moreover, starting indoors allows you to select the strongest, healthiest seedlings for transplant, ensuring a more productive and robust crop.
Finally, starting cherry tomato seeds indoors can be a fun and rewarding activity! It's a great way to connect with nature, even during the colder months, and witness the miracle of plant growth firsthand. It's also an excellent project for kids, teaching them about responsibility and the life cycle of plants.
How to Successfully Start Cherry Tomato Seeds Indoors
Now that you're convinced of the benefits, let's get down to the nitty-gritty of how to successfully start your cherry tomato seeds indoors. The process is relatively straightforward, but attention to detail is key to achieving the best results. Here's a step-by-step guide:
1. Gather Your Supplies
Before you begin, make sure you have all the necessary supplies on hand. This will streamline the process and prevent any last-minute scrambling. Here's a list of essentials:
- Cherry Tomato Seeds: Choose a variety that suits your taste and growing conditions. There are many options available, from classic 'Sweet 100' to heirloom varieties like 'Black Cherry'.
- Seed Starting Trays or Containers: You can use dedicated seed starting trays with individual cells, small pots, or even recycled containers like yogurt cups (with drainage holes).
- Seed Starting Mix: This is a light, sterile mix specifically formulated for germinating seeds. Avoid using garden soil, as it can be too heavy and may contain pathogens.
- Watering Can or Spray Bottle: For gentle watering to avoid disturbing the seeds.
- Heat Mat (Optional): Provides bottom heat to accelerate germination.
- Grow Lights (Essential): Provides adequate light for seedling development. Without supplemental lighting, seedlings will become leggy and weak.
- Humidity Dome or Plastic Wrap: To maintain humidity during germination.
- Labels: To keep track of the different varieties you're growing.
2. Sowing the Seeds
Once you have your supplies ready, it's time to sow the seeds. Follow these steps for optimal germination:
- Moisten the Seed Starting Mix: Add water to the mix until it's evenly moist but not soggy.
- Fill the Containers: Fill your seed starting trays or containers with the moistened mix, leaving about half an inch of space at the top.
- Sow the Seeds: Make a small depression in the center of each cell or container, about ¼ inch deep. Place 2-3 seeds in each depression. This ensures at least one seed will germinate.
- Cover the Seeds: Gently cover the seeds with a thin layer of seed starting mix.
- Water Gently: Water the soil gently with a watering can or spray bottle to avoid disturbing the seeds.
- Cover with a Humidity Dome or Plastic Wrap: This helps to maintain humidity and promote germination.
- Place on a Heat Mat (Optional): If using a heat mat, set it to the recommended temperature for tomato seed germination (around 75-80°F).
- Label the Containers: Clearly label each container with the variety of cherry tomato you're growing and the date of sowing.
3. Providing the Right Environment
Creating the right environment is crucial for successful germination and seedling growth. Here's what to consider:
- Temperature: Cherry tomato seeds germinate best in warm temperatures, around 75-80°F (24-27°C). Use a heat mat to maintain a consistent temperature if your home is cooler.
- Light: Once the seeds germinate, they need plenty of light to grow strong and healthy. Place them under grow lights, positioned a few inches above the seedlings. Aim for 14-16 hours of light per day. Adjust the lights as the seedlings grow to maintain the appropriate distance.
- Humidity: Maintain high humidity during germination by keeping the containers covered with a humidity dome or plastic wrap. Once the seedlings emerge, gradually reduce the humidity by opening the dome or removing the plastic wrap for increasing periods each day.
- Watering: Keep the soil consistently moist but not soggy. Water when the top inch of soil feels dry to the touch. Avoid overwatering, as this can lead to root rot.
- Air Circulation: Good air circulation is important to prevent fungal diseases. Use a small fan to gently circulate the air around the seedlings.
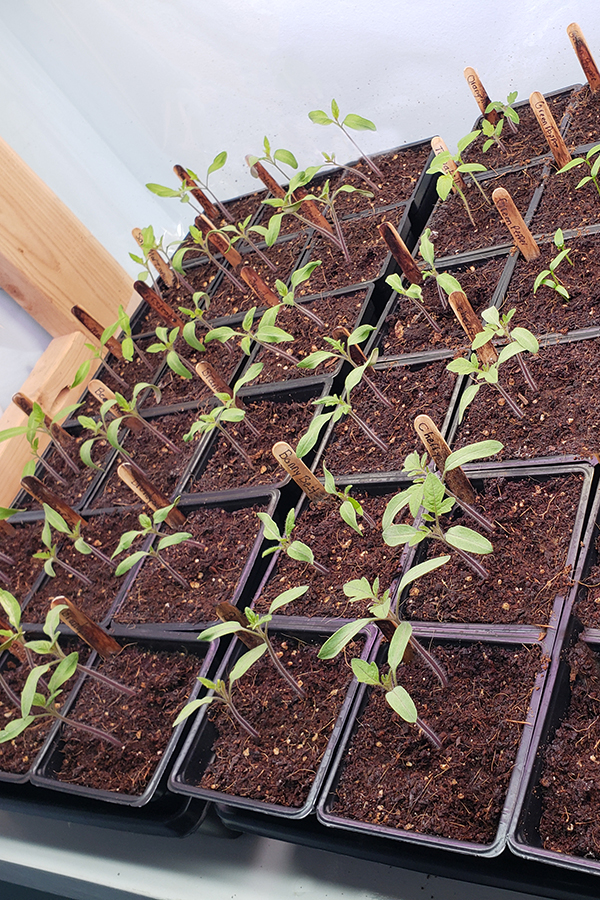
4. Thinning the Seedlings
Once the seedlings have developed their first true leaves (the second set of leaves after the cotyledons), it's time to thin them. This involves removing the weaker seedlings from each container, leaving only the strongest one. Thinning ensures that the remaining seedling has enough space, nutrients, and light to thrive.
To thin the seedlings, use a small pair of scissors to carefully snip off the unwanted seedlings at the soil line. Avoid pulling them out, as this can disturb the roots of the remaining seedling.
5. Hardening Off the Seedlings
Before transplanting your cherry tomato seedlings outdoors, it's essential to harden them off. This process gradually acclimates the seedlings to the outdoor environment, reducing the risk of shock and improving their chances of survival.
Start by placing the seedlings outdoors in a sheltered location for a few hours each day, gradually increasing the amount of time they spend outside. Protect them from direct sunlight, wind, and extreme temperatures. After about a week, they should be ready to be transplanted into the garden.
Case Study: A local gardener, Sarah, tried starting her cherry tomato seeds indoors for the first time last year. She carefully followed the steps outlined above, paying particular attention to providing adequate light and maintaining consistent moisture. As a result, she had a thriving crop of cherry tomato seedlings ready to transplant outdoors weeks before her neighbors, who had directly sown their seeds in the garden. Sarah enjoyed a bountiful harvest of delicious cherry tomatoes all summer long, thanks to her successful indoor seed starting efforts.
Troubleshooting Common Issues When Starting Cherry Tomato Seeds Indoors
Even with the best preparation, you might encounter some common issues when starting cherry tomato seeds indoors. Here are some tips for troubleshooting:
- Poor Germination: This could be due to several factors, including old or low-quality seeds, improper temperature, or lack of moisture. Make sure your seeds are fresh, maintain a warm temperature, and keep the soil consistently moist.
- Leggy Seedlings: Leggy seedlings are tall and spindly, with weak stems. This is usually caused by insufficient light. Move the seedlings closer to the grow lights or increase the amount of light they receive each day.
- Damping Off: Damping off is a fungal disease that can cause seedlings to collapse and die. It's often caused by overwatering and poor air circulation. Avoid overwatering, provide good air circulation, and use a sterile seed starting mix.
- Yellowing Leaves: Yellowing leaves can indicate a nutrient deficiency. Fertilize the seedlings with a diluted solution of liquid fertilizer specifically formulated for seedlings.
- Pests: Indoor seedlings can sometimes be affected by pests like aphids or spider mites. Inspect the seedlings regularly and treat any infestations promptly with insecticidal soap or neem oil.
A Simpler Way? Consider Hydroponics!
If you're looking for an even easier way to start your cherry tomato seeds indoors and continue growing them, you might consider hydroponics. Hydroponic systems provide a controlled environment and deliver nutrients directly to the roots, resulting in faster growth and higher yields. Also, you can use it to grow lettuce and other herbs after growing tomato seeds. Many gardeners are having great success with small, countertop hydroponic kits. If you're looking for a complete system to kickstart your indoor gardening, you might be interested in a system that provides everything you need to start growing, such as a countertop garden setup with integrated LED grow lights and space for multiple plants, like the Ahopegarden Indoor Garden Hydroponics Growing System. You can find it on Amazon here: https://amzn.to/3RPpa Sk.
When to Transplant Your Cherry Tomato Seedlings Outdoors
The time to transplant your cherry tomato seedlings outdoors will depend on your local climate and the last expected frost date. As a general rule, you should transplant them when the soil has warmed up to at least 60°F (15°C) and the danger of frost has passed. This is typically 6-8 weeks after starting the seeds indoors.
Before transplanting, make sure to harden off the seedlings as described above. Choose a sunny location with well-drained soil for planting. Dig a hole slightly larger than the root ball and gently remove the seedling from its container. Plant the seedling deep, burying the stem up to the first set of leaves. This will encourage the development of a strong root system. Water thoroughly after planting and provide support with stakes or cages.
Enjoy the satisfaction of nurturing your cherry tomato plants from tiny seeds to bountiful producers, and savor the delicious flavor of homegrown tomatoes all season long!