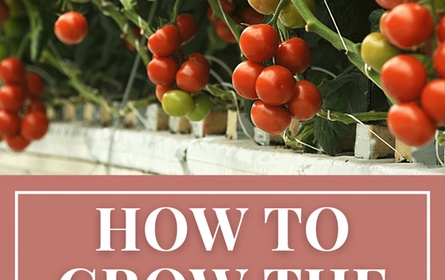
Are you dreaming of juicy, sun-ripened tomatoes bursting with flavor, but lack the space or the time for a traditional garden? Or perhaps you're tired of constantly worrying about whether your tomato plants are getting enough water? Then, the world of self-watering containers might just be your gardening salvation! Let's dive in and explore how you can grow amazing tomatoes using this clever and convenient method. The Magic of Self Watering Containers for Tomato Plants Self-watering containers, sometimes called sub-irrigated planters (SIPs), are designed to provide a consistent and reliable water supply to your plants, minimizing the need for frequent watering and dramatically reducing water waste. For tomato plants, which are known for their thirstiness, this can be a game-changer! The beauty of a tomato plant self watering container lies in its simplicity and efficiency. It essentially creates a mini-reservoir beneath the soil, allowing the plant...
Ever bitten into a sun-ripened, juicy tomato and thought, "I wish I could have more of these"? Well, guess what? You absolutely can! Growing your own tomato plants from a tomato is not only possible, but it's also a surprisingly rewarding experience. Imagine turning a simple fruit into a flourishing plant, bursting with new tomatoes! Let's get started on this fascinating journey and discover the secrets to growing tomato plants from, well, other tomatoes!
Can You Really Grow A Tomato Plant From A Tomato?
Absolutely! While it might seem like magic, growing a tomato plant from a tomato is based on solid botanical principles. Tomatoes contain seeds, and those seeds hold the potential to sprout and grow into new tomato plants. The process involves extracting the seeds, preparing them for germination, and providing the right environment for them to thrive. It's a bit more involved than simply burying a tomato, but with a little patience and know-how, you can successfully propagate your own tomato plants from existing fruits. Think of it as a sustainable way to enjoy your favorite varieties year after year!
Choosing the Right Tomato for Seed Saving and Growing New Plants
Not all tomatoes are created equal when it comes to seed saving and growing. Selecting the right tomato significantly impacts your success. Here's what to look for:
Heirloom vs. Hybrid Tomatoes
This is a crucial distinction.Heirloom tomatoes are open-pollinated varieties, meaning they breed true to type. Their seeds will produce plants that yield tomatoes similar to the parent fruit.Hybrid tomatoes, on the other hand, are the result of cross-pollinating two different tomato varieties. Their seeds may not produce plants that resemble the original tomato, or they might not germinate at all.
Key Difference:
| Feature | Heirloom Tomatoes | Hybrid Tomatoes |
|---|---|---|
| Pollination | Open-pollinated | Cross-pollinated |
| Seed Characteristics | Breed true to type | May not breed true |
| Flavor & Variety | Wide range of unique flavors and shapes | Often bred for disease resistance and yield |
Recommendation: For successful seed saving and growing, prioritize heirloom tomatoes. They offer a higher likelihood of producing plants with the desired characteristics.
Selecting the Best Tomato Fruit
Once you've chosen an heirloom variety, carefully select the fruit you'll use for seed saving. Look for:
Ripeness: Choose a tomato that is fully ripe, even slightly overripe. The seeds inside will be more mature and have a higher germination rate. Health: Select a tomato that is free from blemishes, bruises, or signs of disease. A healthy fruit indicates healthy seeds. Desirable Characteristics:Pick a tomato that represents the best qualities of its variety. If you want large tomatoes, choose a large tomato from your plant. If you love a particular flavor profile, choose a tomato that embodies that flavor.
Popular Heirloom Varieties for Seed Saving
Here are a few reliable heirloom tomato varieties known for their ease of seed saving and excellent flavor:
Brandywine: Large, beefsteak tomatoes with a rich, sweet flavor. Cherokee Purple: Dusky pink-purple tomatoes with a complex, slightly smoky flavor. Roma: Plum tomatoes perfect for making sauces, pastes and canning. San Marzano: Another Italian plum tomato known for their taste and canning and sauce making capabilities. Black Krim: Dark, almost black tomatoes with a slightly salty flavor. Mortgage Lifter: A large, meaty tomato that helped one farmer pay off his mortgage.
Extracting and Preparing Tomato Seeds
Once you've selected the perfect tomato, it's time to extract and prepare the seeds for planting. This process involves fermentation, which helps remove a germination-inhibiting gel surrounding the seeds and increases their chances of successful sprouting.
Step-by-Step Guide to Seed Extraction and Fermentation
- Cut the Tomato: Slice the tomato in half horizontally.
- Scoop Out the Seeds: Using a spoon, scoop out the seeds and surrounding pulp into a clean jar or container.
- Add Water: Add a small amount of water to the jar, about half the volume of the pulp. This will help with the fermentation process.
- Ferment: Cover the jar loosely with a lid or cheesecloth and let it sit at room temperature for 3-4 days. Stir the mixture once or twice a day. You'll notice a layer of mold forming on top – this is normal.
- Check for Separation: After a few days, the good seeds will sink to the bottom of the jar, while the pulp and non-viable seeds will float to the top.
- Rinse and Separate: Pour off the moldy top layer and add more water. Swirl the mixture and let the good seeds settle again. Repeat this rinsing process until the water is clear and only the clean seeds remain at the bottom.
- Dry the Seeds: Spread the seeds out in a thin layer on a paper towel or coffee filter. Allow them to dry completely for 1-2 weeks in a cool, dry place.
- Store the Seeds: Once the seeds are completely dry, store them in an airtight container in a cool, dark, and dry place. Properly stored tomato seeds can remain viable for several years.
Why Fermentation is Important
The fermentation process is crucial because it removes the gelatinous coating around the tomato seeds. This coating contains germination inhibitors that can prevent the seeds from sprouting. By fermenting the seeds, you break down this coating and increase the likelihood of successful germination.
Starting Your Tomato Seeds Indoors
Starting your tomato seeds indoors gives them a head start and allows you to control the growing environment, protecting them from harsh weather and pests. Here's how to do it:
Timing is Key
The ideal time to start your tomato seeds indoors is about 6-8 weeks before the last expected frost date in your area. This timing ensures that your seedlings are large enough to transplant outdoors once the weather warms up.
Fact: You can find your average last frost date by searching online for "[your location] last frost date."
Supplies You'll Need
Seed Starting Trays or Pots: Choose trays or pots with drainage holes to prevent waterlogging. Seed Starting Mix: Use a sterile, soilless seed starting mix that is lightweight and provides good drainage. Avoid using garden soil, as it can contain pathogens that can harm your seedlings. Grow Lights: Tomato seedlings need plenty of light to grow strong and healthy. Use fluorescent or LED grow lights, placing them a few inches above the seedlings. Heat Mat (Optional): A heat mat can help speed up germination by providing consistent warmth to the soil. Spray Bottle:Use a spray bottle to gently water the seedlings without disturbing them.
Sowing the Seeds
- Moisten the Seed Starting Mix: Before planting, moisten the seed starting mix with water until it is evenly damp but not soggy.
- Fill the Trays or Pots: Fill the seed starting trays or pots with the moistened seed starting mix.
- Sow the Seeds: Sow the tomato seeds about 1/4 inch deep, planting 2-3 seeds per cell or pot.
- Cover the Seeds: Gently cover the seeds with a thin layer of seed starting mix.
- Water the Seeds: Water the seeds gently with a spray bottle to avoid dislodging them.
- Provide Warmth and Light: Place the seed starting trays or pots on a heat mat (if using) and under grow lights.
Caring for Your Seedlings
Maintain Moisture: Keep the seed starting mix consistently moist but not soggy. Water the seedlings regularly, allowing the top of the soil to dry out slightly between waterings. Provide Adequate Light: Ensure that the seedlings receive 14-16 hours of light per day. Adjust the height of the grow lights as the seedlings grow to keep them a few inches above the plants. Thin the Seedlings: Once the seedlings have developed their first set of true leaves (the leaves that appear after the initial seed leaves), thin them to one seedling per cell or pot. Choose the strongest, healthiest seedling and snip off the others at the soil line. Fertilize Lightly: After the seedlings have developed their second set of true leaves, begin fertilizing them lightly with a diluted liquid fertilizer formulated for seedlings. Follow the instructions on the fertilizer label.
Transplanting Your Tomato Seedlings Outdoors
After nurturing your tomato seedlings indoors, the time will come to transplant them into your garden. This is a critical step, and proper timing and technique are essential for success.
Hardening Off Your Seedlings
Before transplanting, it's crucial to harden off your seedlings. This process gradually acclimates them to outdoor conditions, reducing the risk of shock and ensuring they can thrive in their new environment. For about a week or two, gradually increase the amount of time your seedlings spend outdoors. Start by placing them in a sheltered location for a few hours each day, protecting them from direct sunlight and strong winds. Gradually increase the amount of time they spend outdoors and expose them to more sunlight and wind. At the end of the hardening-off period, your seedlings should be able to tolerate a full day outdoors.
Choosing the Right Location
Tomatoes thrive in sunny locations with well-drained soil. Choose a spot in your garden that receives at least 6-8 hours of direct sunlight per day. The soil should be rich in organic matter and well-draining to prevent root rot.
Preparing the Soil
Before transplanting, prepare the soil by amending it with compost or other organic matter. This will improve drainage, fertility, and overall soil health. Till the soil to a depth of at least 12 inches and remove any rocks or debris.
Transplanting Procedure
- Dig the Holes: Dig holes that are slightly larger than the root balls of your seedlings. Space the holes about 2-3 feet apart, depending on the variety of tomato.
- Add Fertilizer (Optional): Add a small amount of slow-release fertilizer to the bottom of each hole to provide the seedlings with a boost of nutrients.
- Remove the Seedlings: Gently remove the seedlings from their trays or pots, being careful not to damage the roots.
- Plant the Seedlings: Place the seedlings in the holes and backfill with soil. Plant the seedlings slightly deeper than they were in their containers, as this will encourage the development of more roots.
- Water the Seedlings: Water the seedlings thoroughly after transplanting to help them settle into their new home.
- Mulch (Optional): Apply a layer of mulch around the base of the plants to help retain moisture, suppress weeds, and regulate soil temperature.
Providing Support
Most tomato varieties require support to prevent them from sprawling on the ground. Use stakes, cages, or trellises to support your plants. This will help to improve air circulation, reduce the risk of disease, and make it easier to harvest the tomatoes.
Caring for Your Tomato Plants
Once your tomato plants are transplanted outdoors, proper care is essential for ensuring a bountiful harvest. This includes watering, fertilizing, pruning, and pest and disease control.
Watering
Tomatoes need consistent watering, especially during hot, dry weather. Water deeply and regularly, aiming to keep the soil evenly moist but not waterlogged. Avoid overhead watering, as this can promote disease. Water at the base of the plants or use a drip irrigation system.
Tip: Check the soil moisture by sticking your finger into the soil a few inches. If the soil feels dry, it's time to water.
Fertilizing
Tomatoes are heavy feeders and benefit from regular fertilization. Use a fertilizer that is specifically formulated for tomatoes, following the instructions on the label. Fertilize every 2-3 weeks during the growing season.
Pruning
Pruning tomato plants can help to improve air circulation, reduce the risk of disease, and encourage fruit production. Remove suckers (the small shoots that grow between the main stem and the branches) to direct the plant's energy towards fruit development. For indeterminate varieties, pinch off the top of the plant towards the end of the growing season to encourage the remaining fruits to ripen.
Pest and Disease Control
Tomatoes are susceptible to various pests and diseases. Monitor your plants regularly for signs of problems and take action promptly. Common pests include aphids, tomato hornworms, and whiteflies. Common diseases include early blight, late blight, and blossom end rot.
Prevention is Key:
Choose disease-resistant varieties.
Provide good air circulation.
Avoid overhead watering.
Rotate your crops each year.
Use organic pest control methods.
Harvesting Your Tomatoes
The moment you've been waiting for! Harvesting your homegrown tomatoes is one of the most satisfying experiences for any gardener. Tomatoes are typically ready for harvest when they are fully colored, slightly soft to the touch, and easily detach from the vine. Gently twist or snip the tomatoes from the plant, being careful not to damage the stems or surrounding fruits.
Enjoying Your Homegrown Tomatoes
There are endless ways to enjoy your homegrown tomatoes. Eat them fresh off the vine, slice them into salads, make homemade tomato sauce, or can them for later use. The possibilities are endless!
Growing a tomato plant from a tomato is a simple way to enjoy fresh vegetables. This process provides a continuous cycle of fresh homegrown fruits and vegetables. Hopefully, you are now armed with the knowledge and confidence to embark on your own tomato-growing adventure. Happy gardening!