Are you dreaming of juicy, sun-ripened tomatoes bursting with flavor, but lack the space or the time for a traditional garden? Or perhaps you're tired of constantly worrying about whether your tomato plants are getting enough water? Then, the world of self-watering containers might just be your gardening salvation! Let's dive in and explore how you can grow amazing tomatoes using this clever and convenient method. The Magic of Self Watering Containers for Tomato Plants Self-watering containers, sometimes called sub-irrigated planters (SIPs), are designed to provide a consistent and reliable water supply to your plants, minimizing the need for frequent watering and dramatically reducing water waste. For tomato plants, which are known for their thirstiness, this can be a game-changer! The beauty of a tomato plant self watering container lies in its simplicity and efficiency. It essentially creates a mini-reservoir beneath the soil, allowing the plant...
Picture this: it's February, the snow is still falling, and the garden feels miles away. But what if you could bring a taste of summer indoors, nurturing tiny tomato plants that will eventually burst forth with juicy, sun-ripened fruit? Starting your own tomato seedlings indoors is not only a rewarding experience but also a fantastic way to get a head start on the growing season and cultivate unique varieties that you might not find at your local nursery. Let's dive into the wonderful world of indoor tomato cultivation!
Why Start Tomato Seedlings Indoors?
There are several compelling reasons why starting tomato seedlings indoors is a smart move for any gardener, from novice to seasoned pro. Let's explore some of the biggest benefits:
Extending the Growing Season
One of the most significant advantages of starting tomato seedlings indoors is the ability to extend the growing season. Tomatoes need a long, warm growing season to thrive. By starting seeds indoors 6-8 weeks before the last expected frost, you give your plants a significant head start. This means you'll be harvesting delicious tomatoes weeks, or even months, earlier than if you waited to plant them directly in the garden. This is especially crucial in regions with shorter summers.
Access to a Wider Variety of Tomatoes
Nurseries and garden centers often carry a limited selection of tomato varieties. By starting your own seeds, you gain access to a vast array of heirloom, hybrid, and specialty tomatoes that might not be readily available locally. Seed catalogs and online retailers offer an incredible selection, allowing you to choose tomatoes based on flavor, size, color, disease resistance, and other specific traits. Want to grow a 'Cherokee Purple' with its smoky-sweet flavor, or a 'San Marzano' perfect for making sauce? Starting from seed gives you that freedom.
Cost-Effectiveness
Purchasing tomato seedlings from a nursery can quickly become expensive, especially if you're planning on growing a large number of plants or trying multiple varieties. Buying a packet of seeds, on the other hand, is significantly cheaper and allows you to grow many plants for a fraction of the cost. Consider this: a packet of 25 tomato seeds might cost a few dollars, while a single tomato plant from a nursery can easily cost $5 or more. The savings add up quickly, especially if you save seeds from your own plants in subsequent years!
Control Over Growing Conditions
When you start your own tomato seedlings indoors, you have complete control over the growing environment. This includes factors like soil quality, temperature, light, and watering. You can ensure that your seedlings receive optimal conditions for healthy growth, leading to stronger, more productive plants. This level of control is difficult to achieve when relying on nursery-grown seedlings, which may have been subjected to less-than-ideal conditions.
The Joy of Gardening
Beyond the practical benefits, starting tomato seedlings indoors is simply a rewarding and enjoyable experience. There's something incredibly satisfying about nurturing tiny seeds into thriving plants. It's a great way to connect with nature, learn about plant life cycles, and get your hands dirty (in a good way!). Plus, the anticipation of harvesting your own homegrown tomatoes adds a layer of excitement to the gardening process.
Gathering Your Supplies for Starting Tomato Seeds Indoors
Before you embark on your tomato-growing adventure, you'll need to gather the necessary supplies. Here's a comprehensive list to get you started:
Tomato Seeds
Choose varieties that are well-suited to your climate and growing conditions. Consider factors like disease resistance, days to maturity, and desired fruit size and flavor. Reputable seed companies offer detailed descriptions of their varieties, making it easier to select the right tomatoes for your needs.
Pro Tip: If you plan on saving seeds from your tomato plants, choose heirloom varieties, as the seeds from hybrid tomatoes may not produce plants that are true to type.
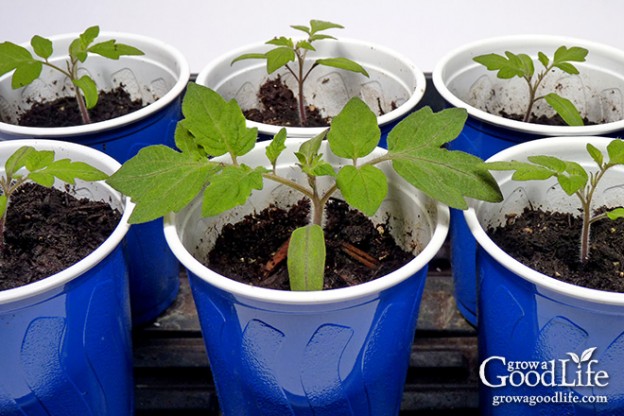
Seed Starting Trays or Pots
You'll need containers to start your seeds in. Seed starting trays with individual cells are a popular choice, as they make it easy to transplant seedlings later. Alternatively, you can use small pots (2-3 inches in diameter) made of plastic, peat, or biodegradable materials. Biodegradable pots can be planted directly into the ground, reducing transplant shock.
Seed Starting Mix
This is a specially formulated soil mix that is lightweight, well-draining, and sterile. It's designed to provide optimal conditions for seed germination and seedling growth. Avoid using garden soil, as it can be too heavy, compacted, and may contain disease-causing pathogens. You can purchase seed starting mix at most garden centers or online retailers.
Watering Can or Spray Bottle
You'll need a gentle watering can or spray bottle to keep the soil moist during germination and seedling growth. Avoid overwatering, which can lead to damping-off, a fungal disease that can kill young seedlings.
Heat Mat (Optional but Recommended)
A heat mat provides bottom heat, which can significantly improve germination rates and speed up seedling growth. Tomato seeds germinate best at temperatures between 75-85°F. A heat mat will help maintain this optimal temperature, especially in cooler climates.
Grow Lights (Essential)
Tomato seedlings need plenty of light to grow strong and healthy. A sunny windowsill is often not enough, especially during the shorter days of winter and early spring. Grow lights provide consistent, high-intensity light that will prevent seedlings from becoming leggy and weak. Fluorescent shop lights or LED grow lights are both good options. You'll need to position the lights close to the seedlings (a few inches above the tops of the plants) and adjust them as the plants grow.
Timer
A timer will automate the process of turning the grow lights on and off, ensuring that your seedlings receive a consistent amount of light each day (typically 14-16 hours).
Labels and a Permanent Marker
Don't forget to label each tray or pot with the variety of tomato you're growing. This will help you keep track of your plants and ensure that you plant them in the correct location in the garden.
The Process: Starting Tomato Seedlings Indoors Step-by-Step
Now that you've gathered your supplies, it's time to get your hands dirty! Here's a step-by-step guide to starting tomato seedlings indoors:
Step 1: Prepare Your Containers
Fill your seed starting trays or pots with seed starting mix. Gently tamp down the soil to remove any air pockets, but avoid compacting it too much. Moisten the soil thoroughly with water, allowing any excess water to drain out.
Step 2: Sow the Seeds
Make a small indentation (about 1/4 inch deep) in the center of each cell or pot. Place 2-3 tomato seeds in each indentation. Covering multiple seeds in each pot increases the chance of germination. Cover the seeds with a thin layer of seed starting mix. Gently water the soil again to ensure good contact between the seeds and the soil.
Step 3: Provide Warmth and Moisture
Place your seed starting trays or pots on a heat mat (if using). Cover the trays or pots with a clear plastic dome or plastic wrap to create a humid environment. This will help the seeds germinate more quickly. Place the trays or pots in a warm location, such as a sunny windowsill or under grow lights.
Step 4: Monitor Germination
Check the soil moisture daily and water as needed to keep it consistently moist but not soggy. Tomato seeds typically germinate within 5-10 days. Once the seedlings emerge, remove the plastic dome or plastic wrap and place the trays or pots under grow lights.
Step 5: Provide Adequate Light
Position your grow lights a few inches above the tops of the seedlings. Adjust the lights as the plants grow to maintain the proper distance. Provide 14-16 hours of light per day. Use a timer to automate the process.
Step 6: Thin the Seedlings
Once the seedlings have developed their first set of true leaves (the leaves that appear after the initial seed leaves, or cotyledons), thin them to one plant per cell or pot. Choose the strongest, healthiest-looking seedling and carefully snip off the others at the soil line with a pair of scissors. This will prevent overcrowding and ensure that each plant has enough space and nutrients to grow.
Step 7: Fertilize the Seedlings
After the seedlings have been thinned, begin fertilizing them with a diluted liquid fertilizer specifically formulated for seedlings. Follow the instructions on the fertilizer label. Fertilize every 1-2 weeks.
Step 8: Harden Off the Seedlings
About a week before you plan to transplant your tomato seedlings into the garden, you'll need to "harden them off." This process gradually acclimates the seedlings to outdoor conditions, such as sunlight, wind, and temperature fluctuations. To harden off your seedlings, start by placing them outdoors in a sheltered location for a few hours each day. Gradually increase the amount of time they spend outdoors each day, and gradually expose them to more sunlight and wind. After a week, your seedlings should be ready to be transplanted into the garden.
Troubleshooting Common Issues When Starting Tomato Seedlings Indoors
Even with the best intentions, problems can sometimes arise when starting tomato seedlings indoors. Here are some common issues and how to address them:
Damping-Off
Damping-off is a fungal disease that can kill young seedlings. It's often caused by overwatering and poor air circulation. To prevent damping-off, use a sterile seed starting mix, avoid overwatering, and provide good air circulation. If you notice signs of damping-off (such as wilting or collapsing seedlings), remove the affected plants immediately and treat the remaining plants with a fungicide.
Leggy Seedlings
Leggy seedlings are tall and spindly, with long stems and few leaves. This is usually caused by insufficient light. To prevent leggy seedlings, provide adequate light by using grow lights and positioning them close to the plants. You can also try brushing the seedlings gently with your hand a few times a day to encourage them to develop stronger stems.
Yellowing Leaves
Yellowing leaves can be a sign of nutrient deficiency. This is often caused by using a poor-quality seed starting mix or not fertilizing the seedlings adequately. To correct nutrient deficiencies, fertilize the seedlings with a diluted liquid fertilizer specifically formulated for seedlings.
Slow Germination
Slow germination can be caused by several factors, including cold temperatures, dry soil, or old seeds. To improve germination rates, provide warmth by using a heat mat, keep the soil consistently moist, and use fresh seeds.
Moving Your Tomato Seedlings Outdoors
Once your tomato seedlings have been properly hardened off and the danger of frost has passed, you can transplant them into the garden. Choose a sunny location with well-drained soil. Dig a hole that is slightly larger than the root ball of the seedling. Gently remove the seedling from its pot and place it in the hole. Backfill with soil and water thoroughly. Space tomato plants 2-3 feet apart, depending on the variety. Provide support for the plants with stakes or cages.
Conclusion
Starting tomato seedlings indoors is a rewarding and cost-effective way to get a head start on the growing season. By following these tips and techniques, you can successfully nurture healthy, robust tomato plants that will produce an abundance of delicious, homegrown tomatoes. So, grab your seeds, gather your supplies, and get ready to enjoy the fruits (or rather, vegetables) of your labor!